

CONSERVATION OF AN ICON DEPICTING JESUS CHRIST. FROM A GRAVEYARD OF SPIDERS TO A GOLDEN TREASURE
Autor:
Maria Lillepruun
Number:
Anno 2019/2020
Category:
Conservation
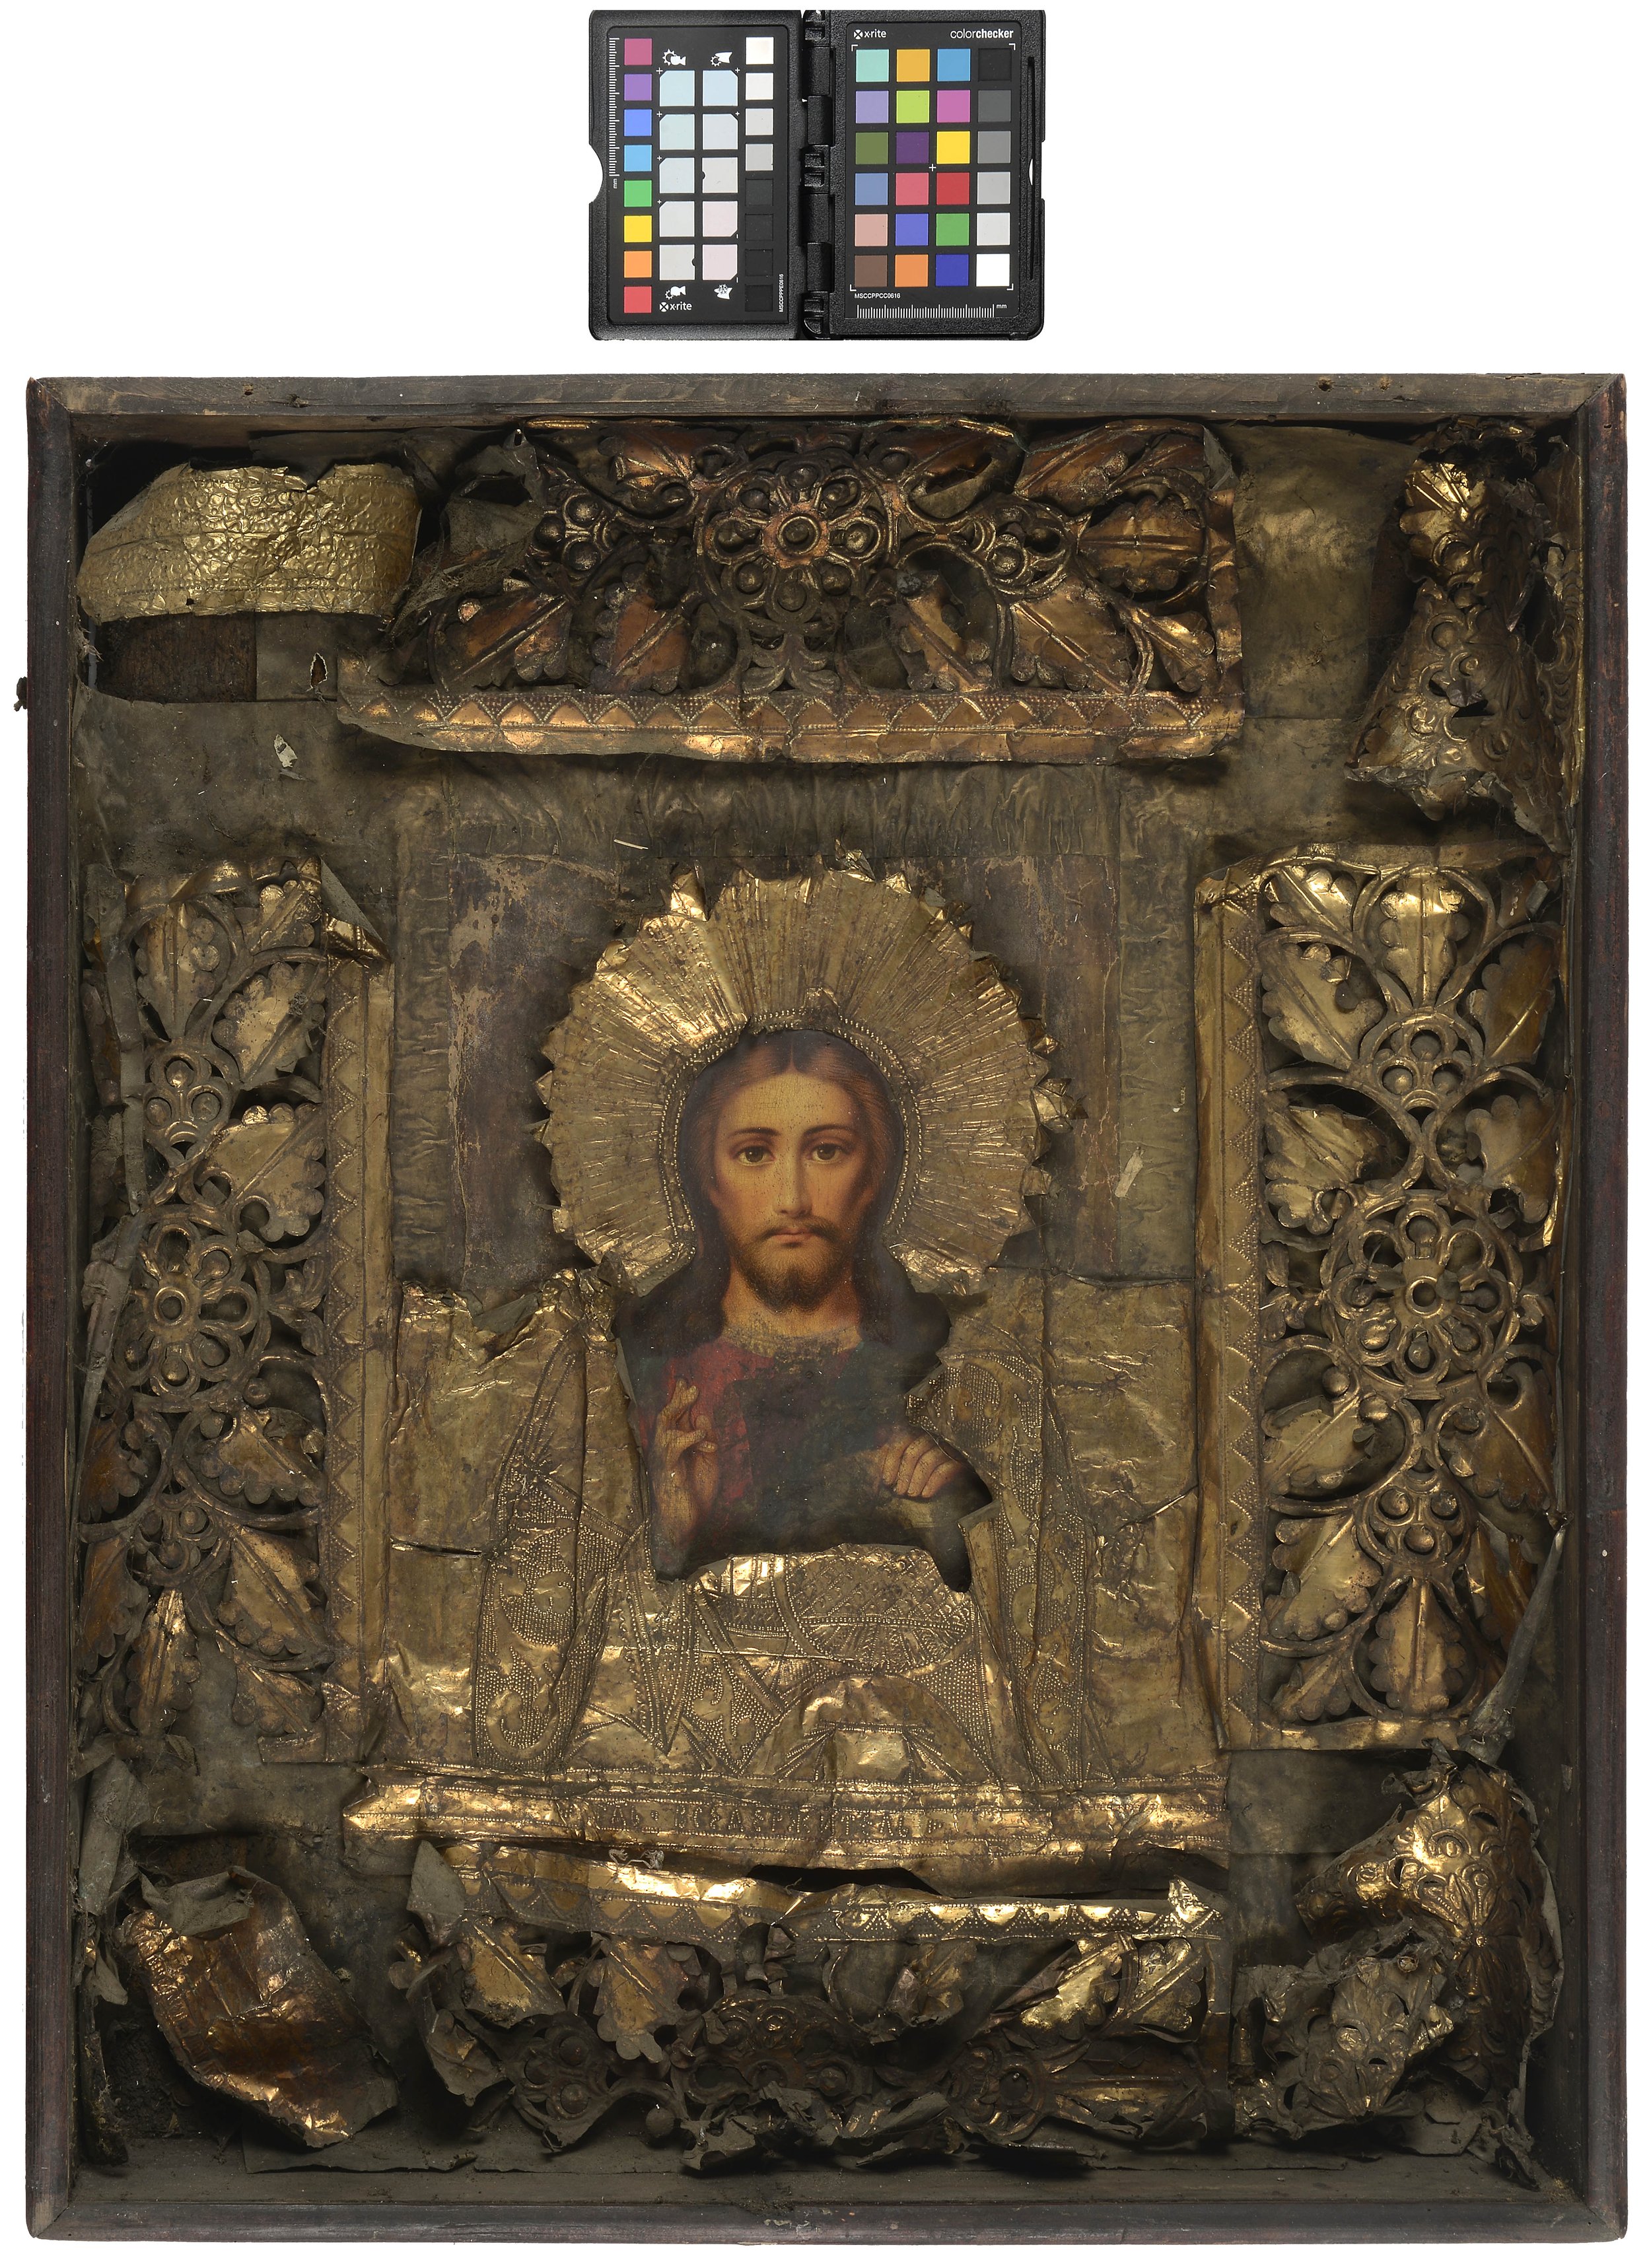


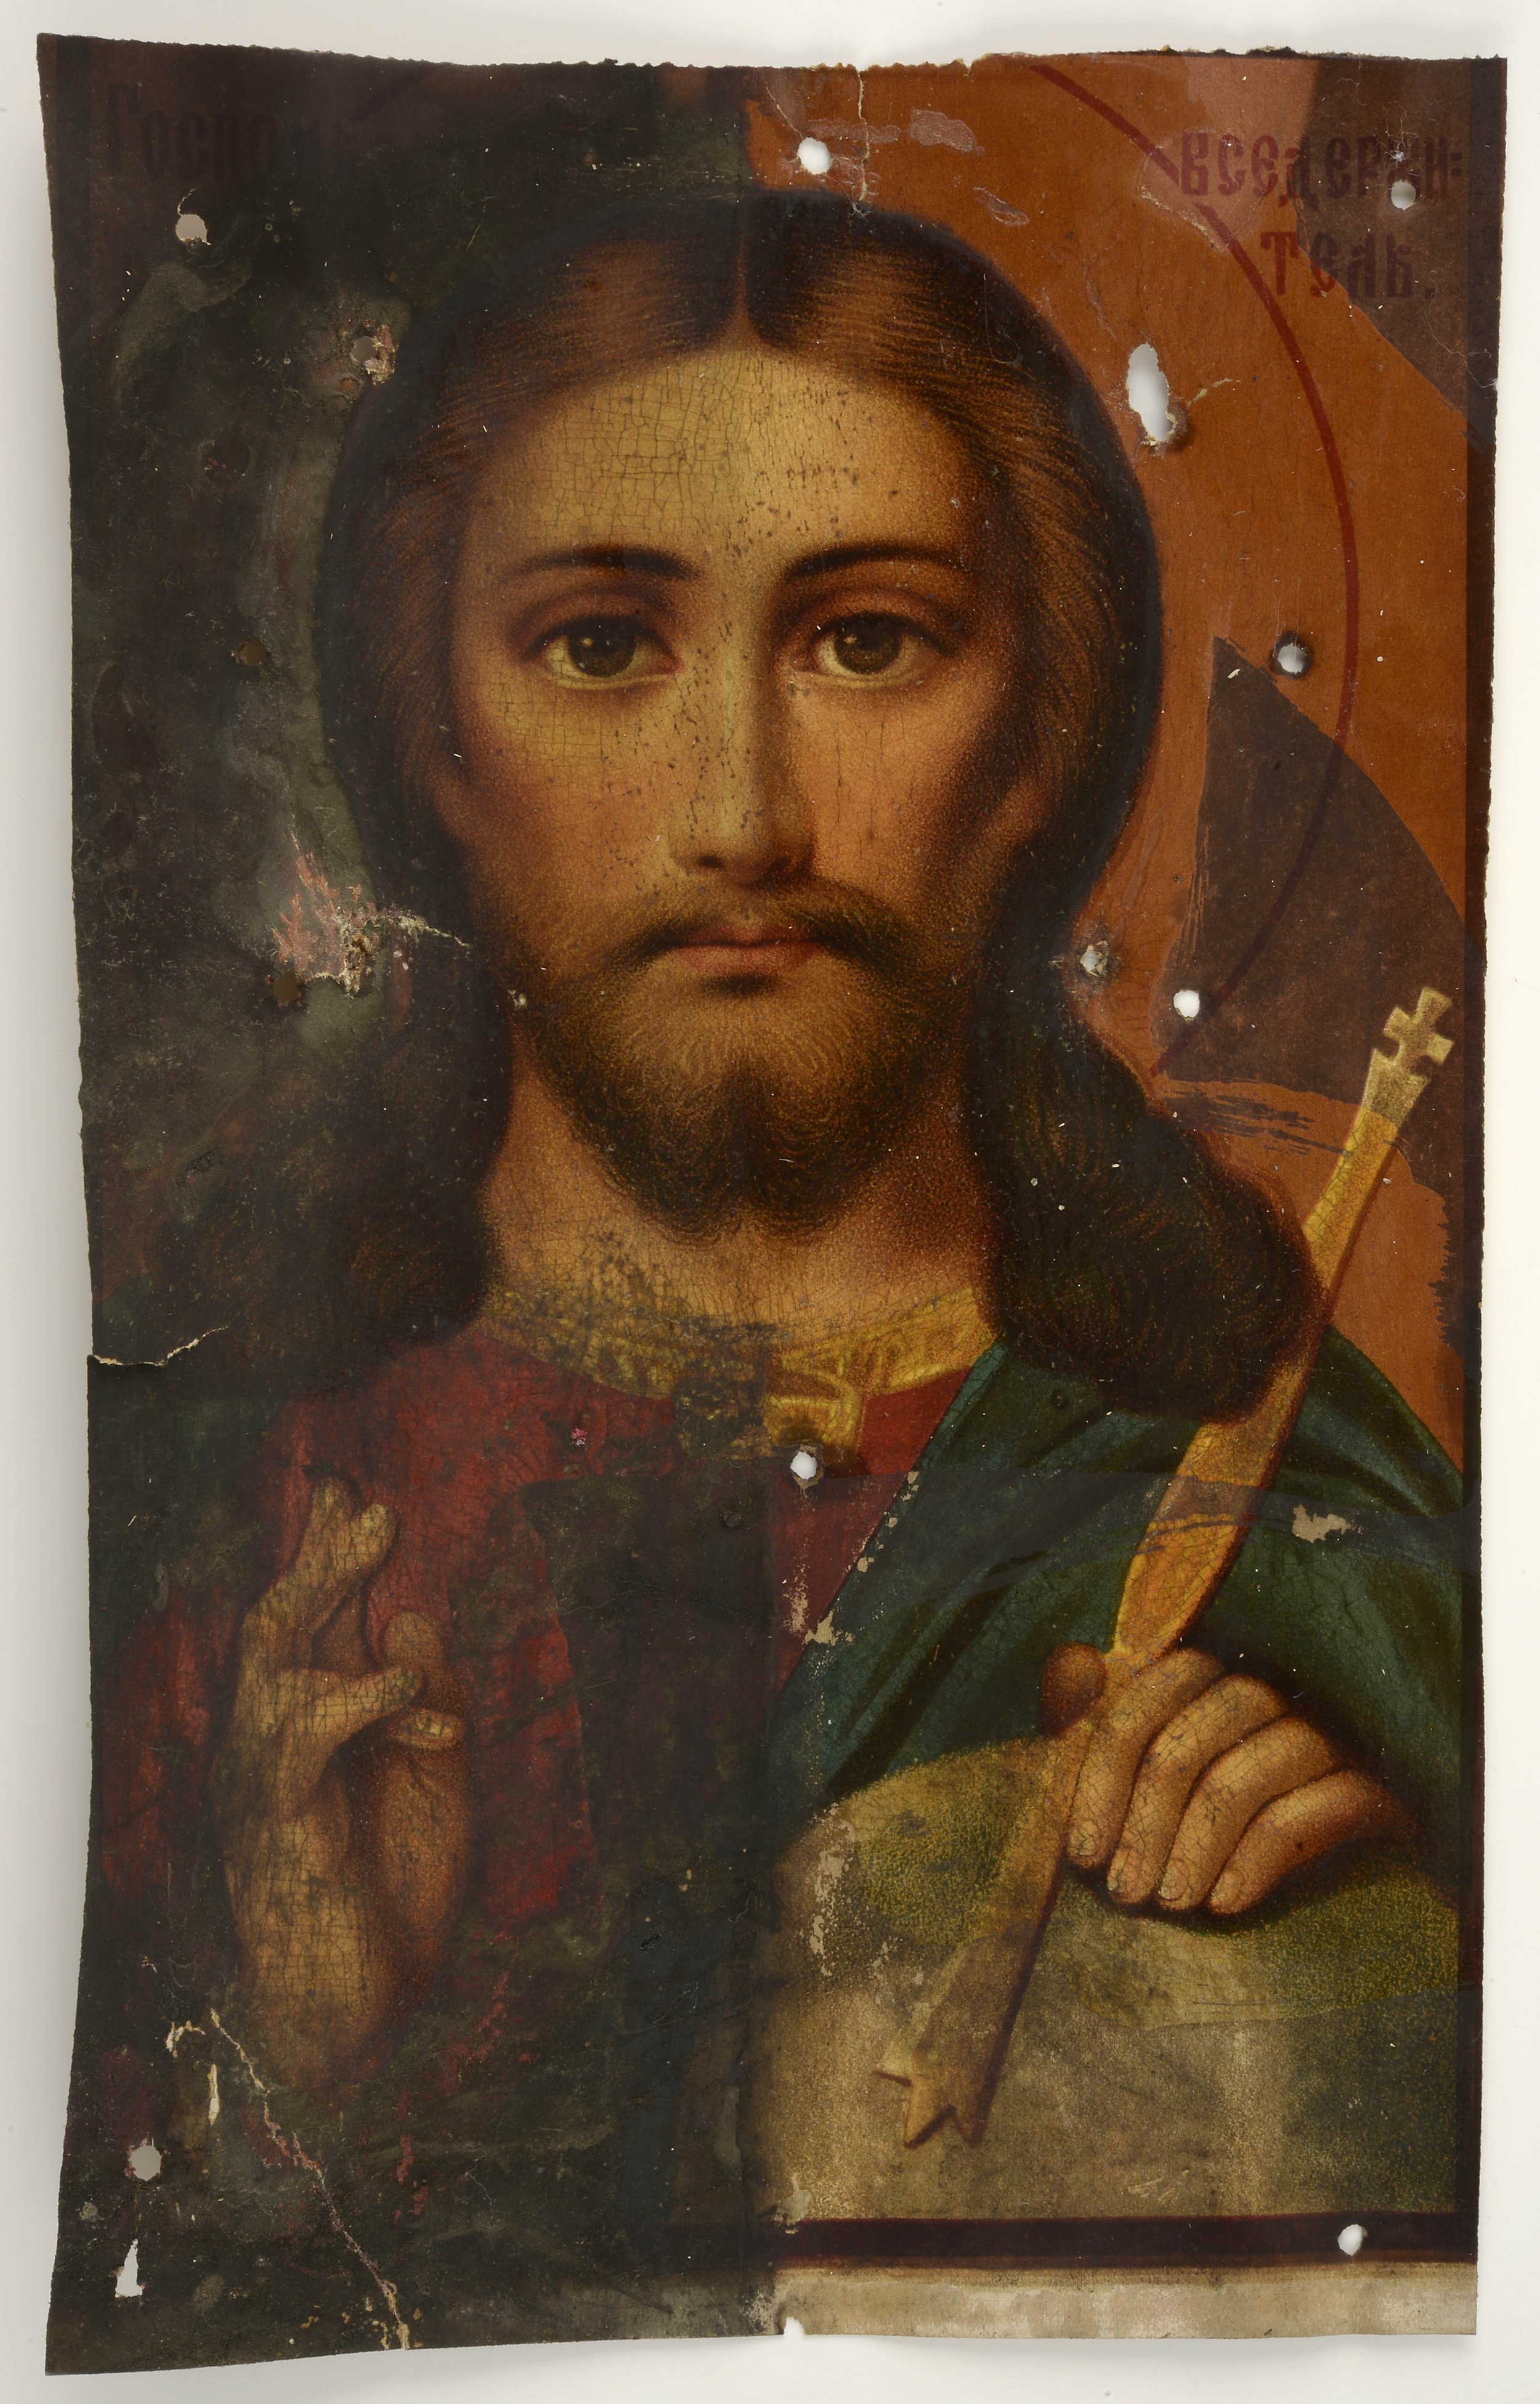
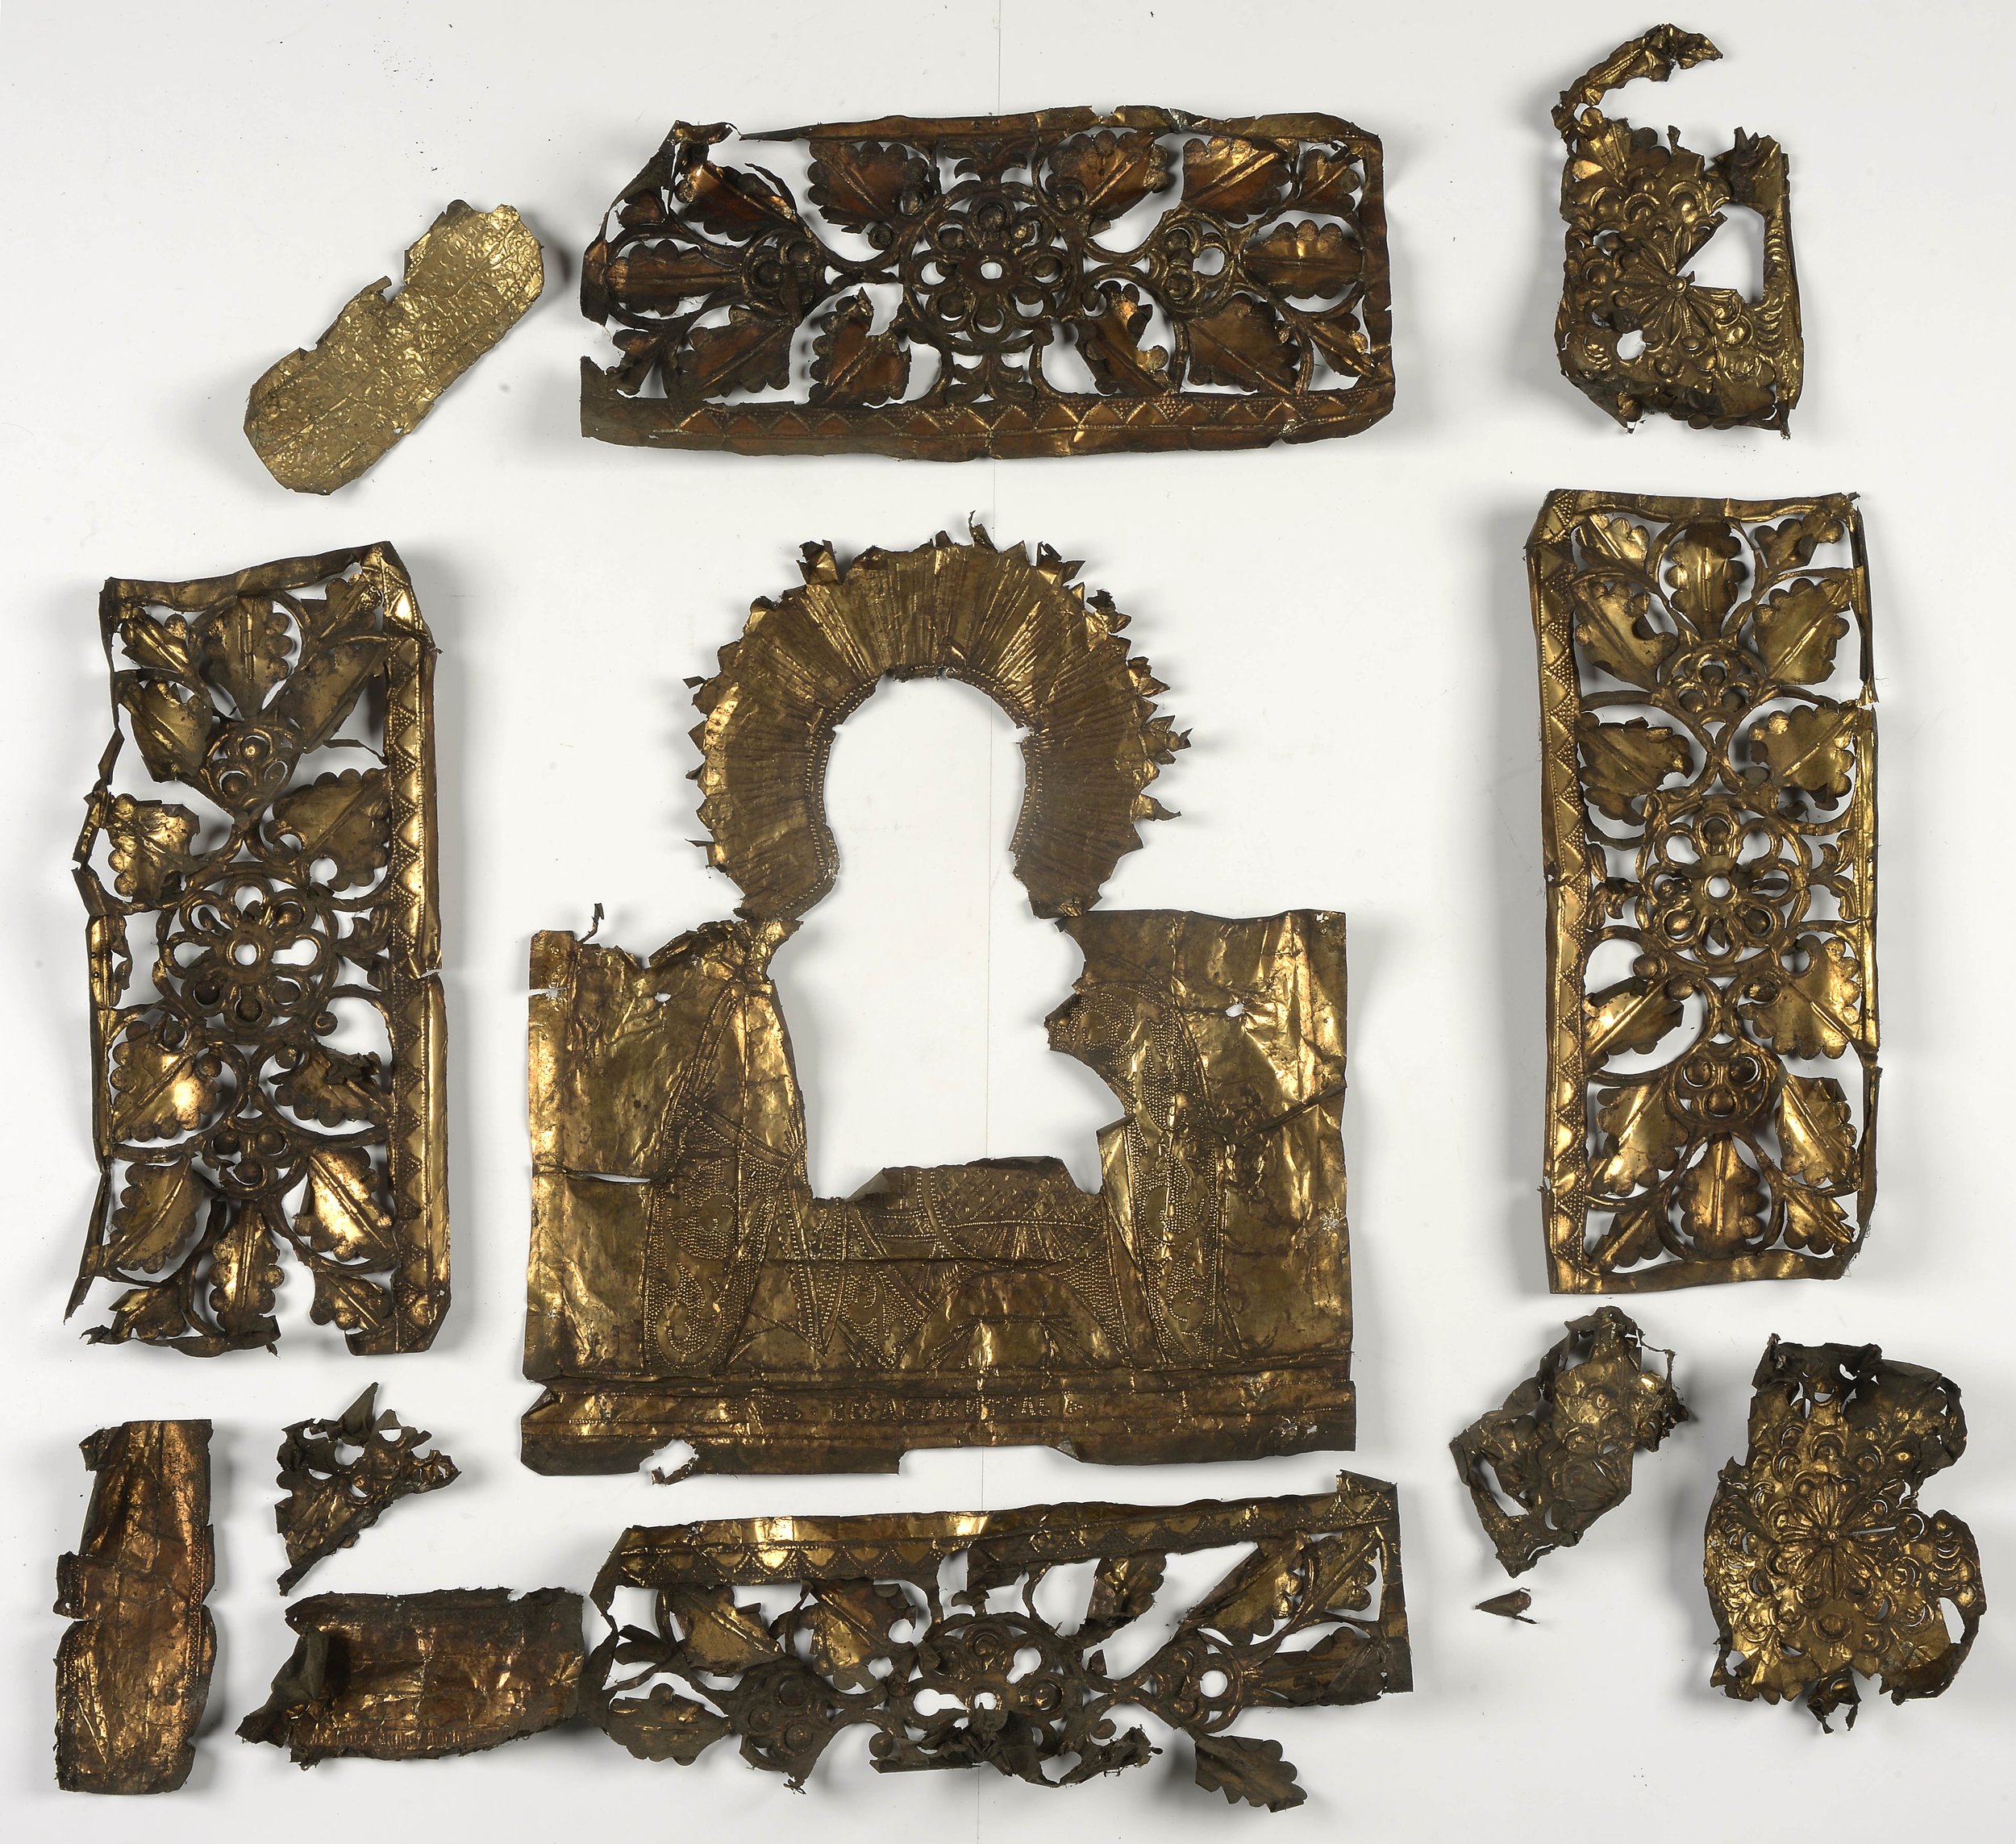
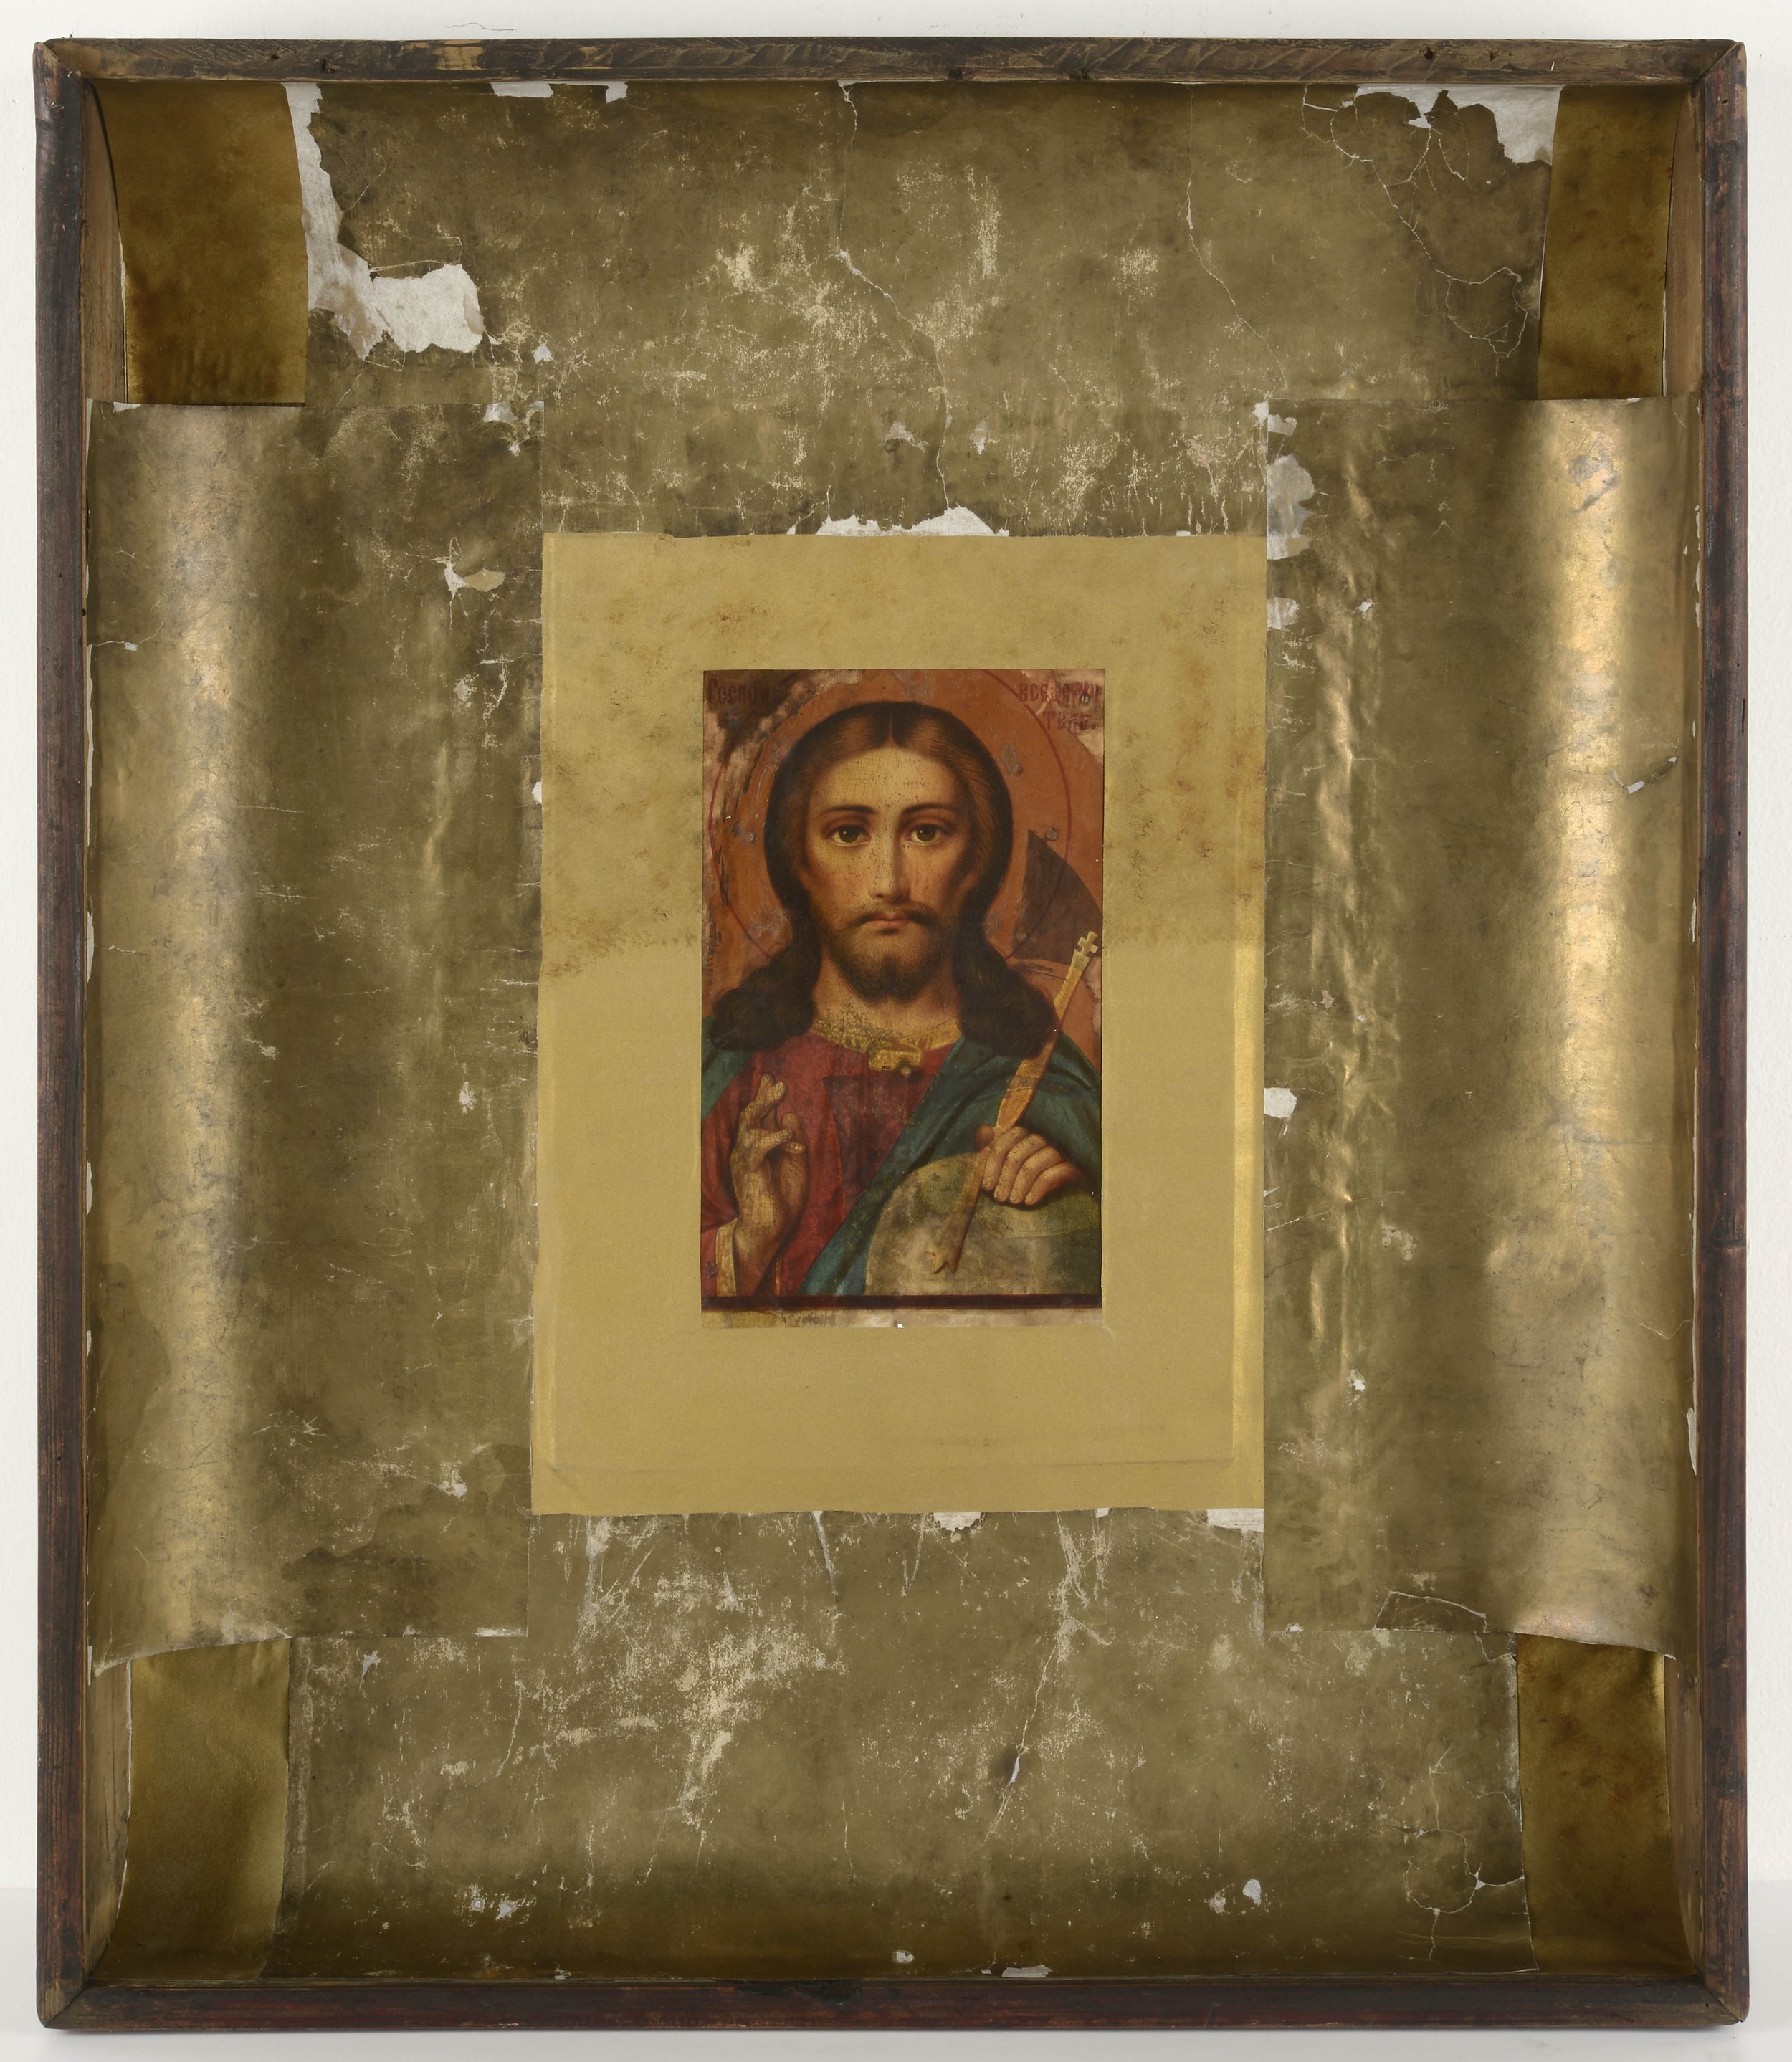
One day a big box containing an icon was brought to the conservation and digitisation centre Kanut (further on – Kanut) from Setomaa (in the south east of Estonia). It was difficult to believe in the possibility of conservation as the icon in the box was in a really bad condition [ill 1]. However, the conservation efforts that lasted for three months exceeded our every expectation.
The icon came from Luikjärve farm that is an open-air branch-museum of the Obinitsa Local Lore Museum in Setomaa. The farm stands on a naturally beautiful elevated bank of the Tuhkvitsa brook in the village of Tobrova. A small seto house of worship, the Tobrovo tsässon is nearby. Luikjärve farm itself has survived as a traditional seto fortified farm, meaning that its buildings and fences with a high gate-wall compile a closed yard. The oldest farm buildings date from the late 19th century and still show quite a few old-fashioned architectural details. At present the farmhouse is being refurbished and the whole complex brushed up. The Obinitsa Local Lore Museum intends to open Luikjärve as an impressive experience farm offering several programmes and events of live history. When this plan is realised, the icon will be taken back to the farm, where it would certainly be a vital part of the peculiar display.
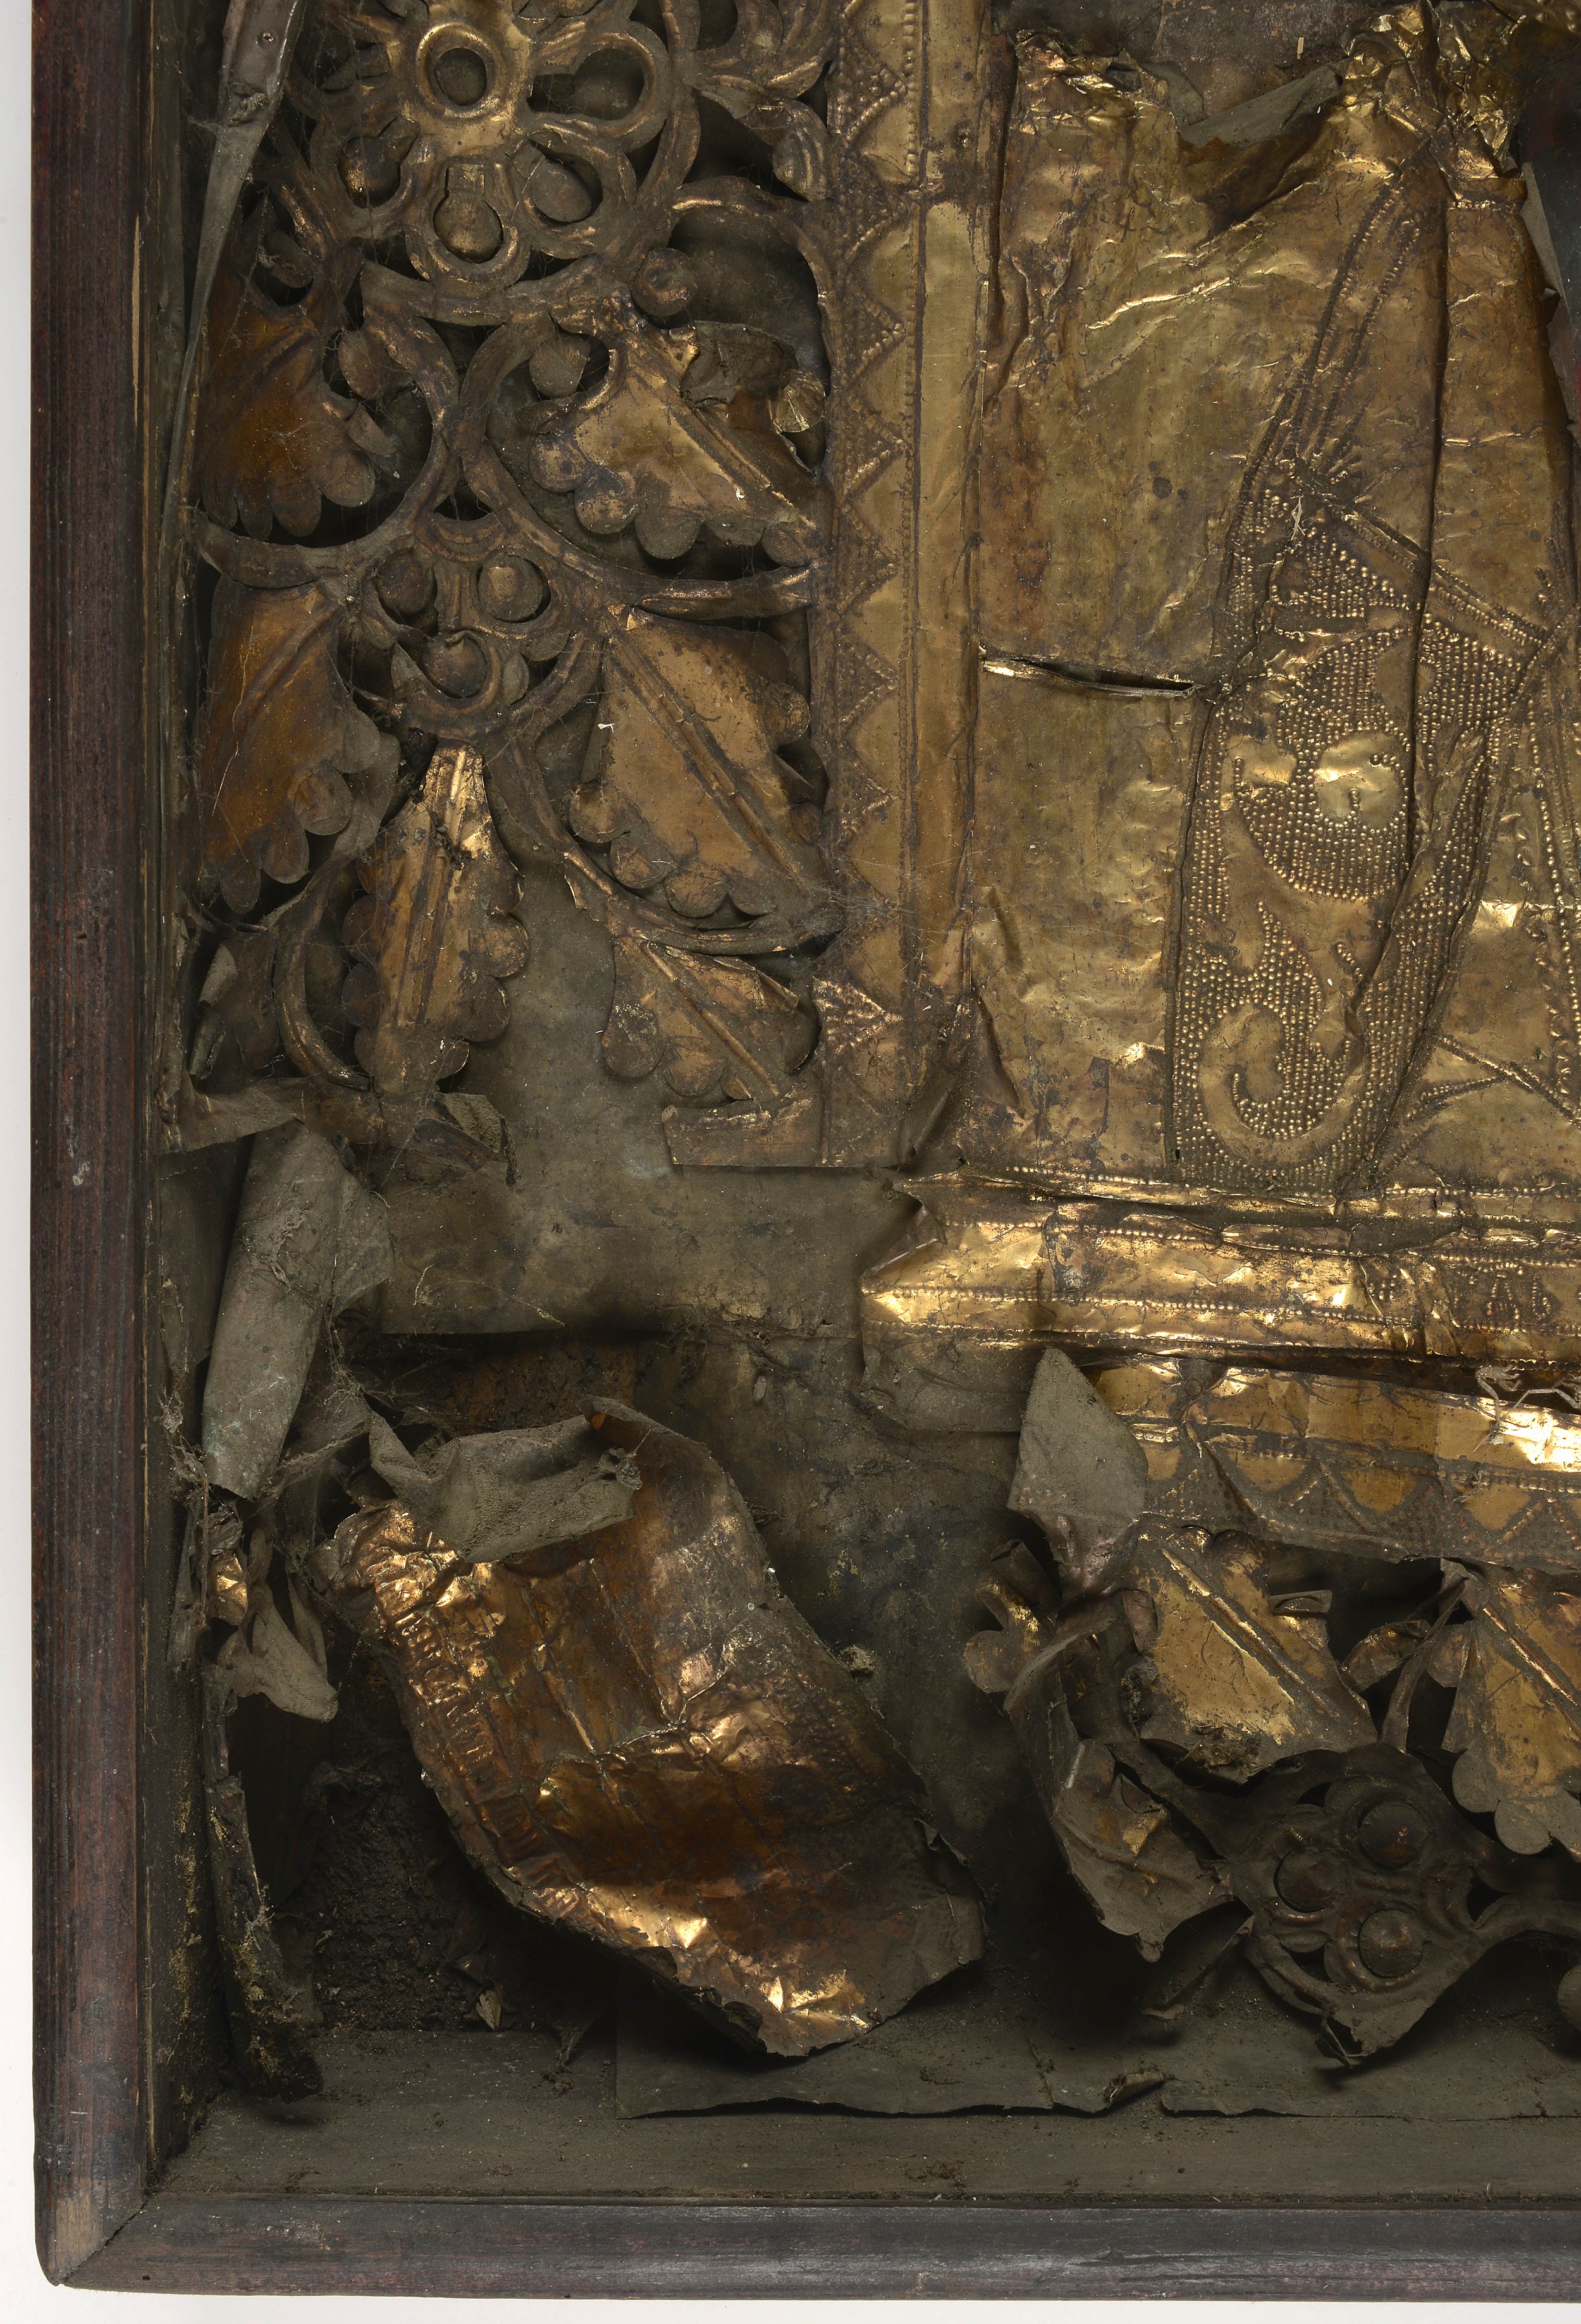
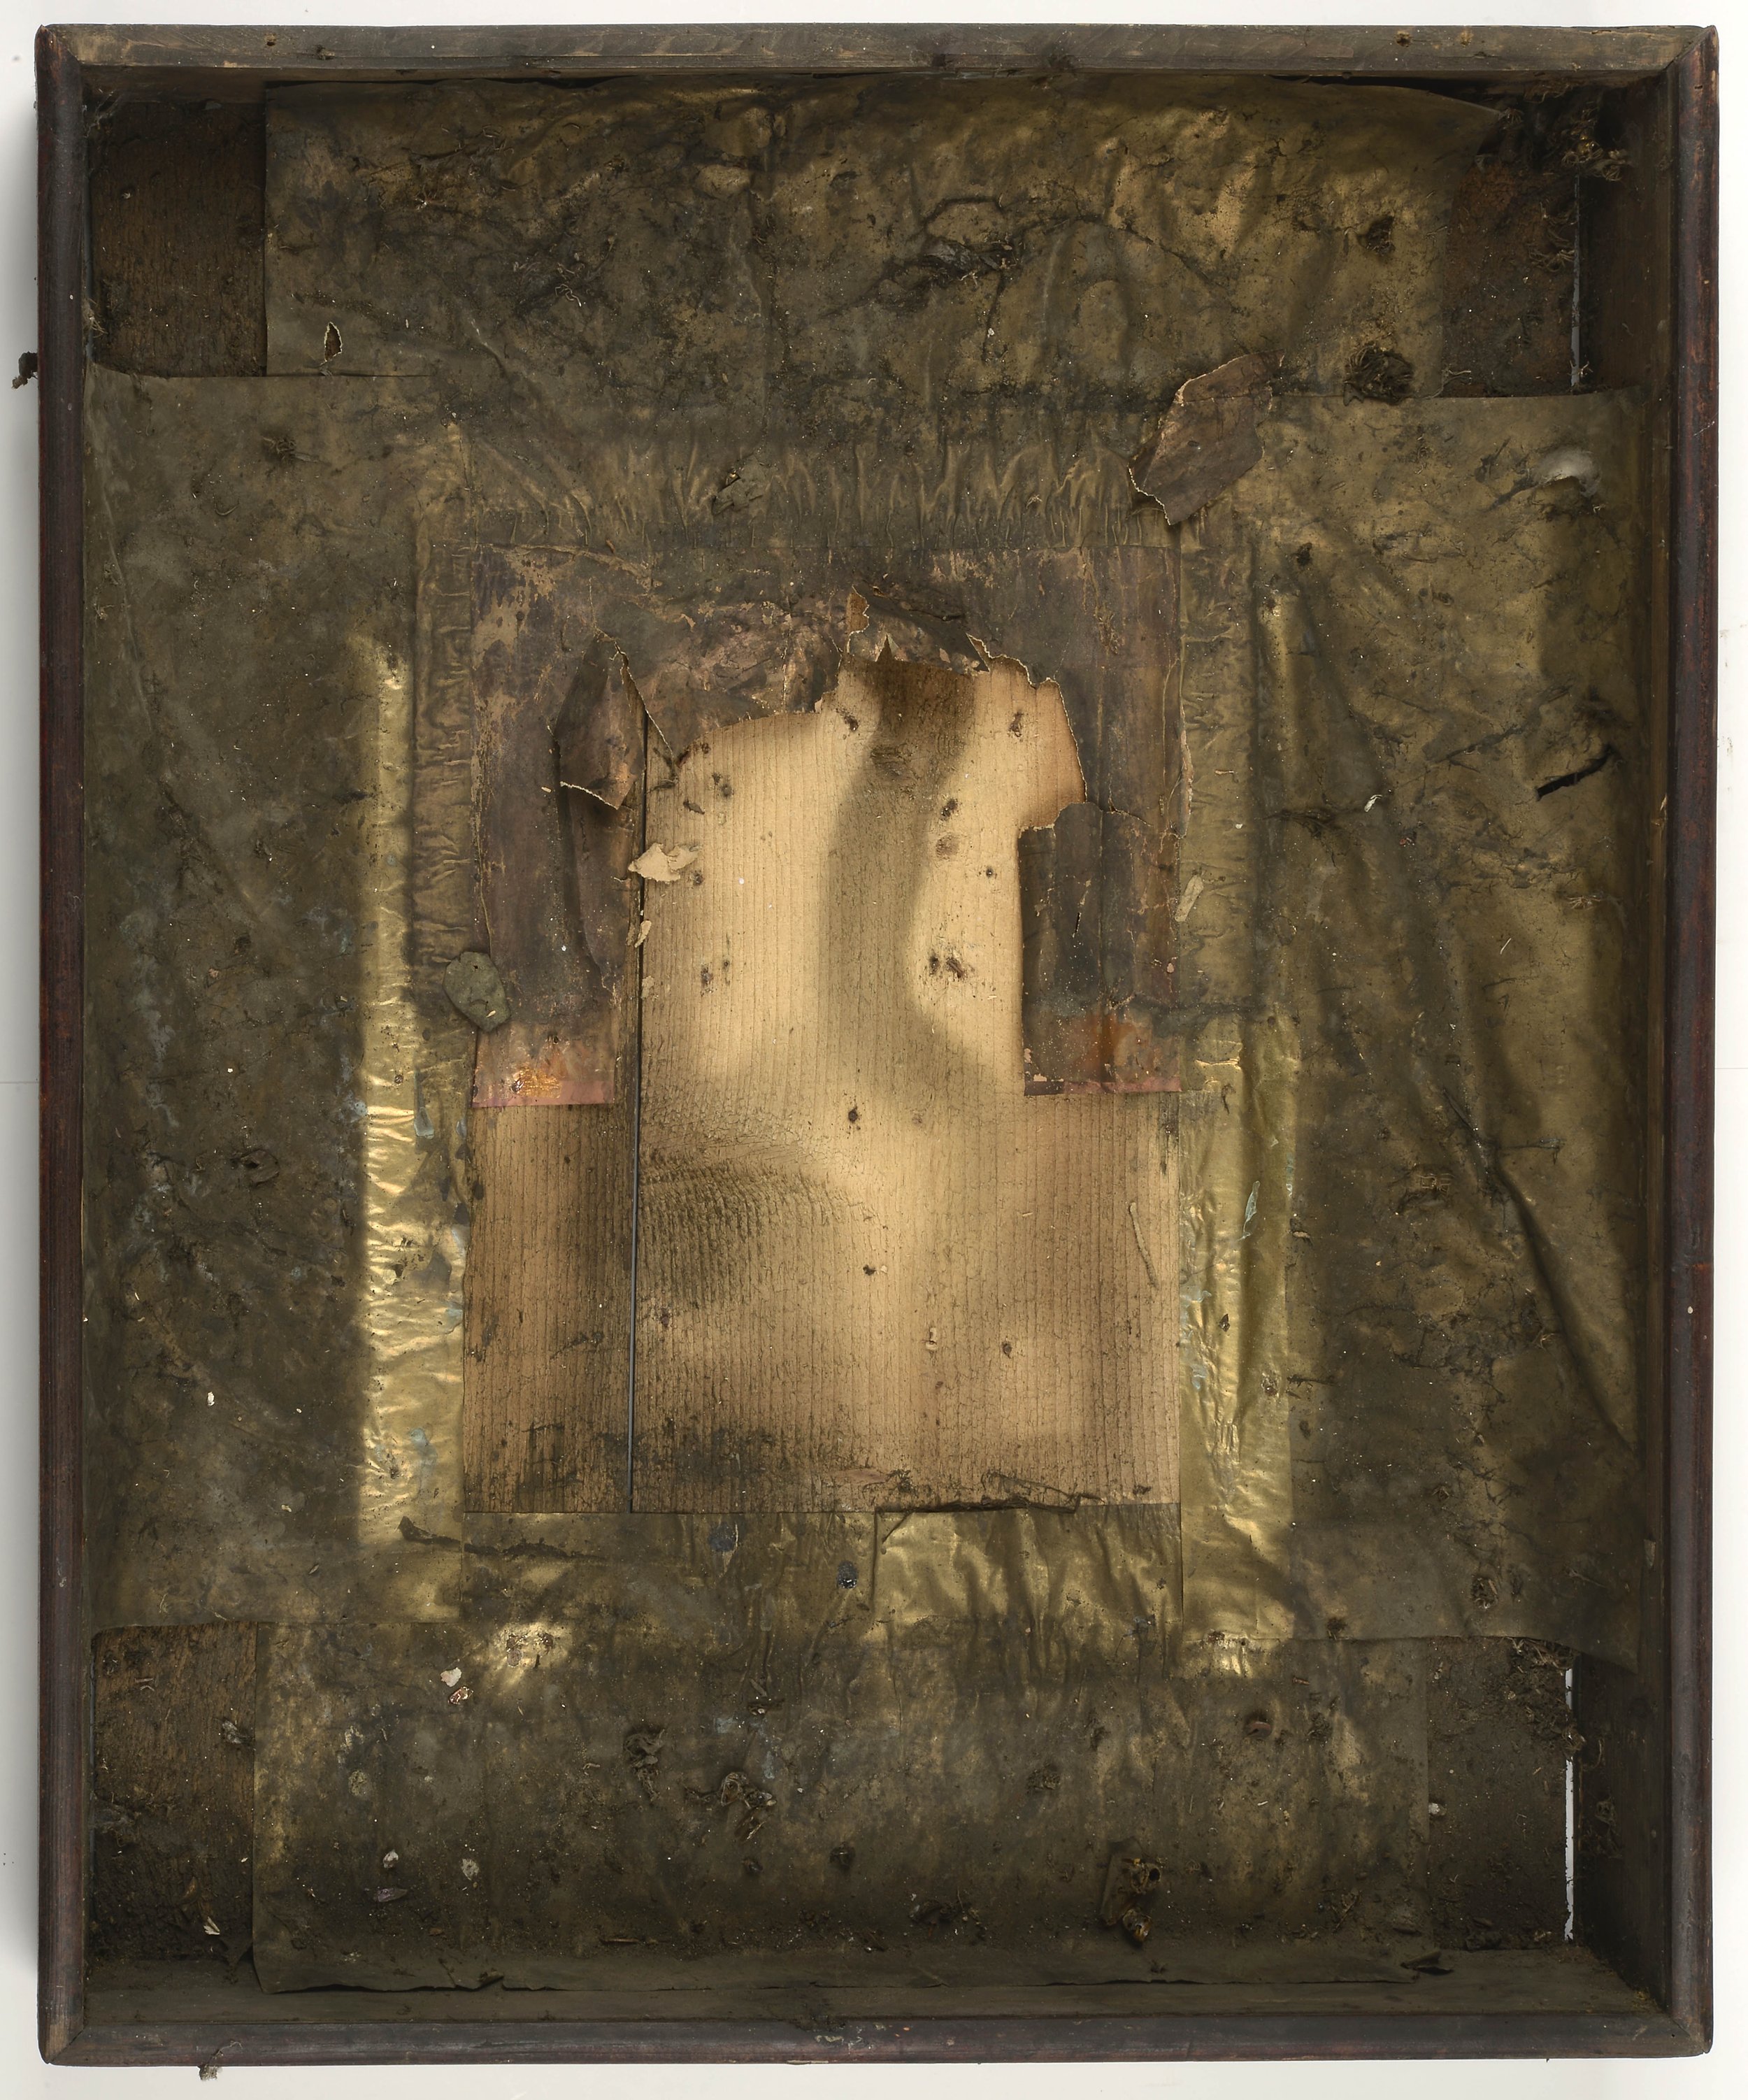
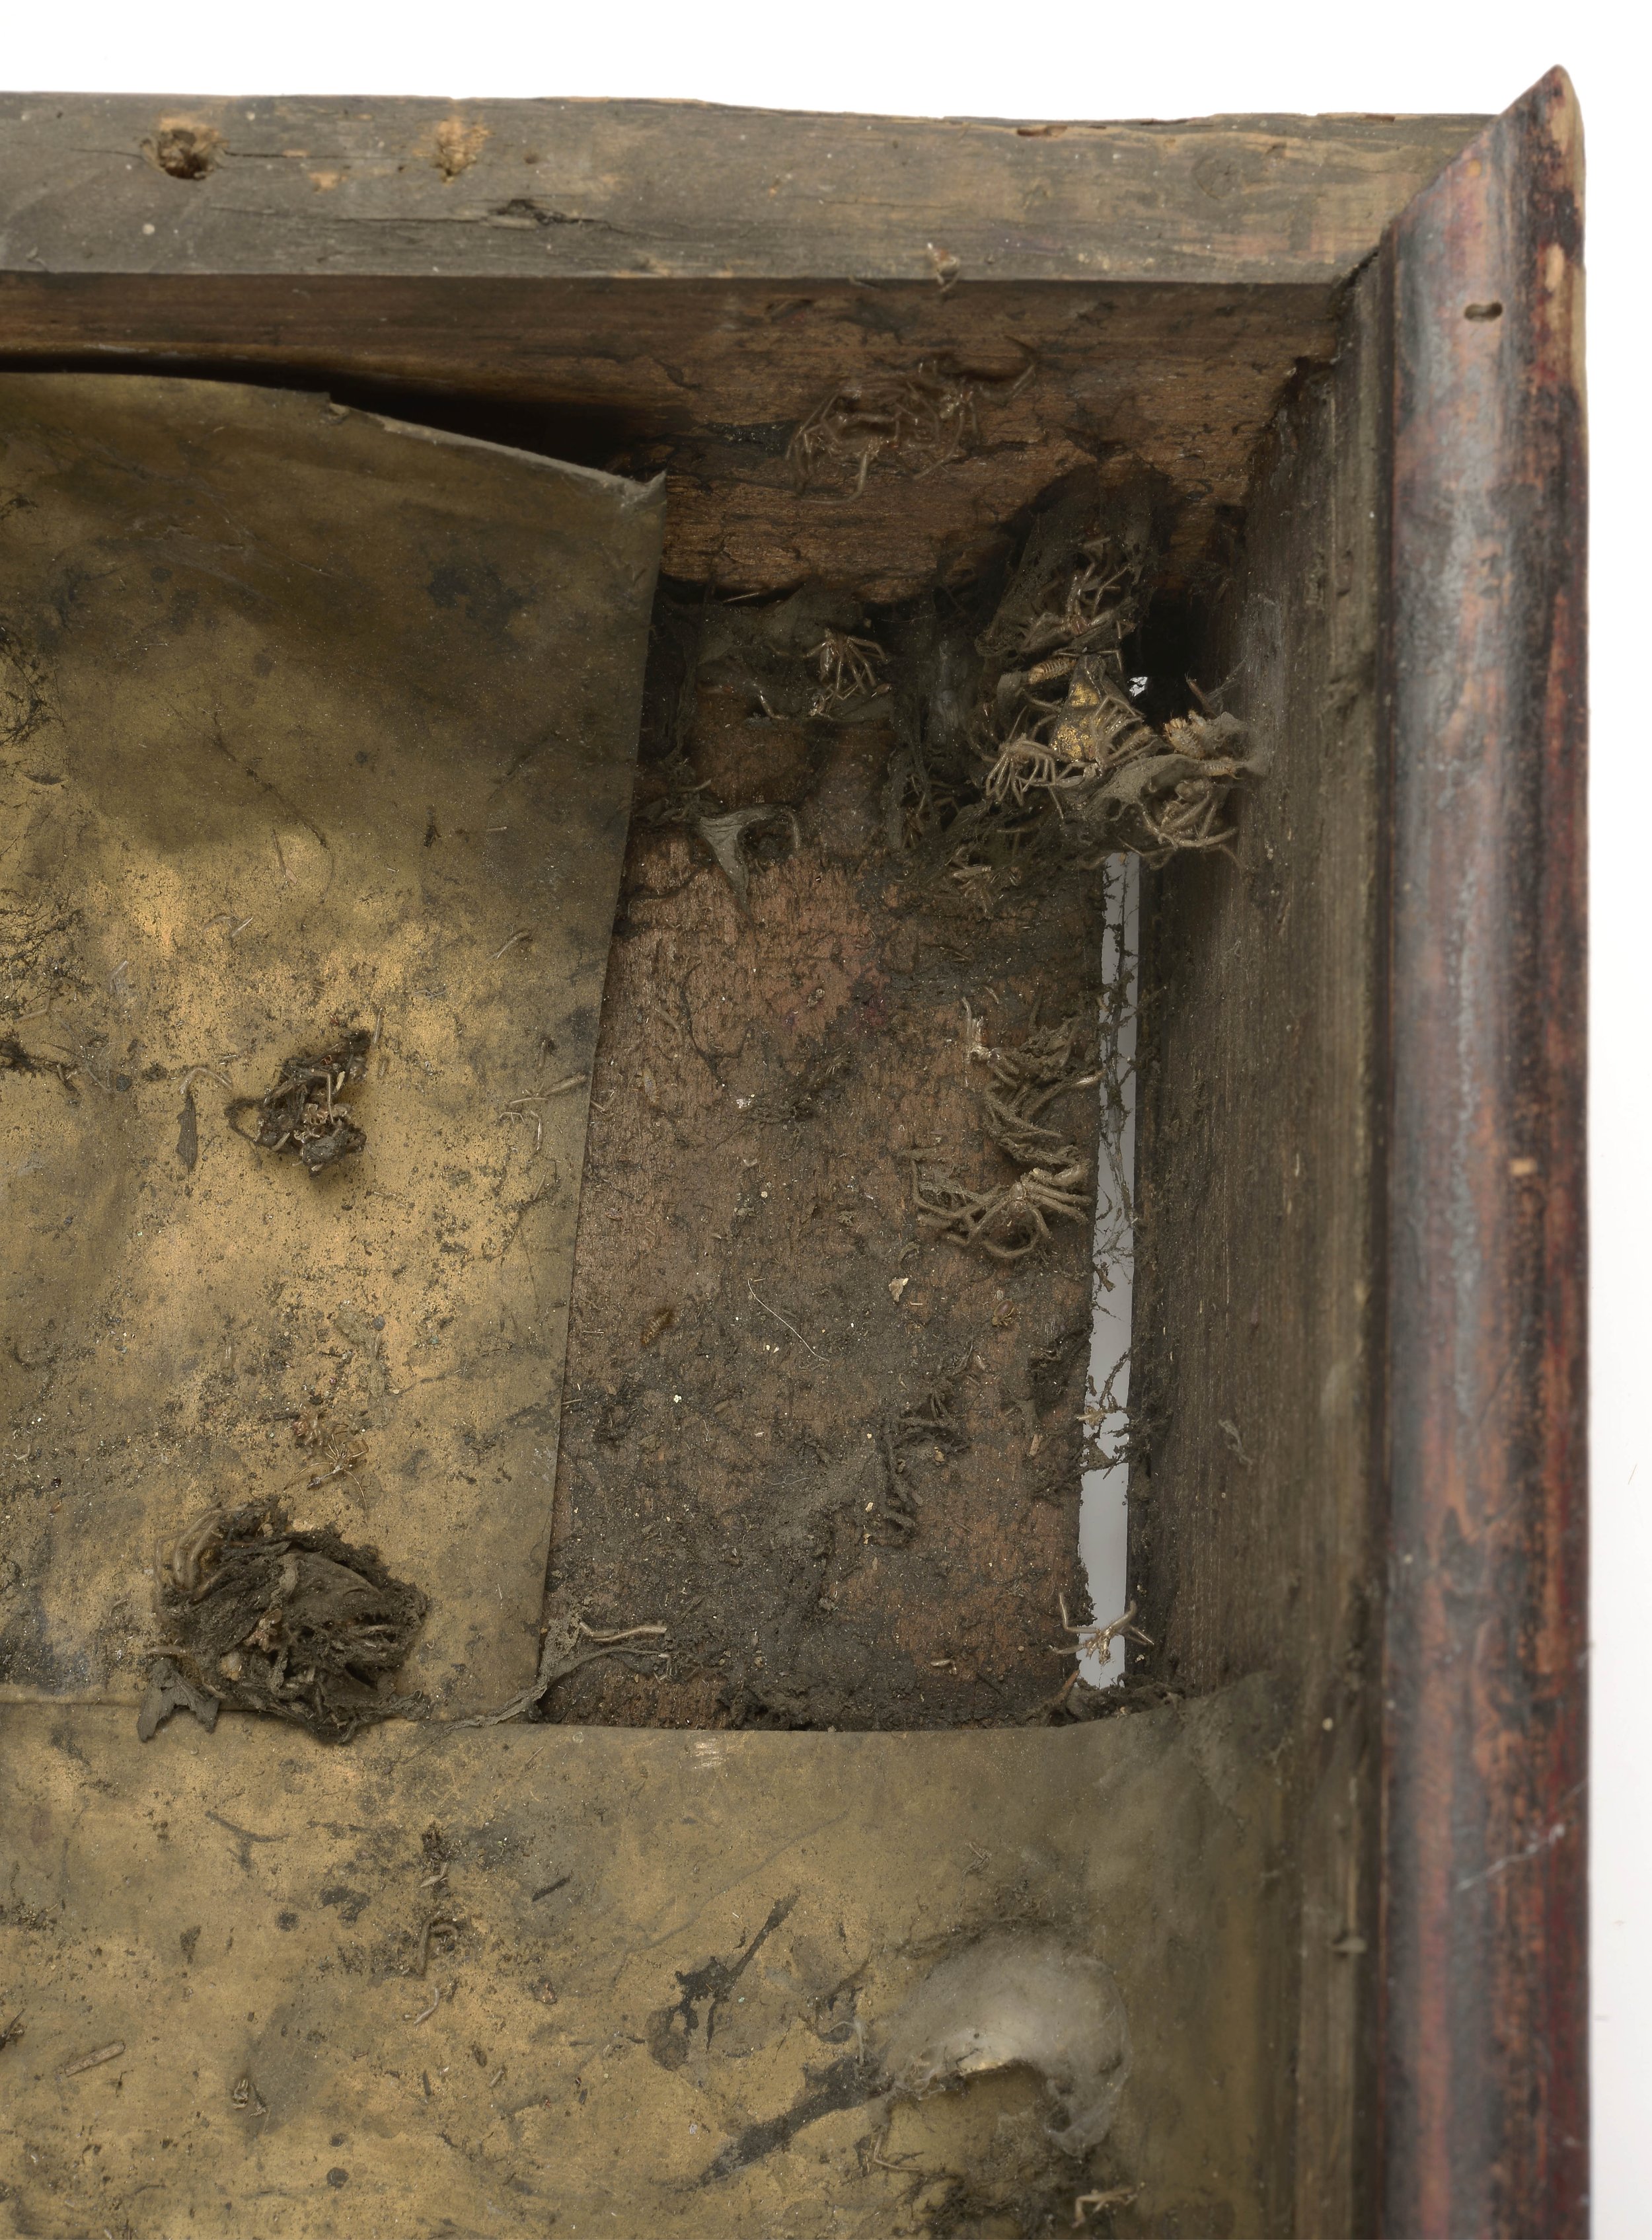
The museum should not be accused of mistreating the damaged icon, for it had remained deserted at the old farm when the last owners died. As the frontal glass was missing the box was dirty and soot-soiled inside. [ill 3] Cobwebs full of dead flies and wasps filled all the corners of the box – some of them had even formed curiously grotesque rolls [ill 4], [ill 6], [ill 7].
Description of the icon
The oblong wooden box measures 70 x 60cm. Its back has been made of pinewood boards, not equal in width. The sides of the box were more or less stabile but the details were deformed and the whole object was extremely dirty.
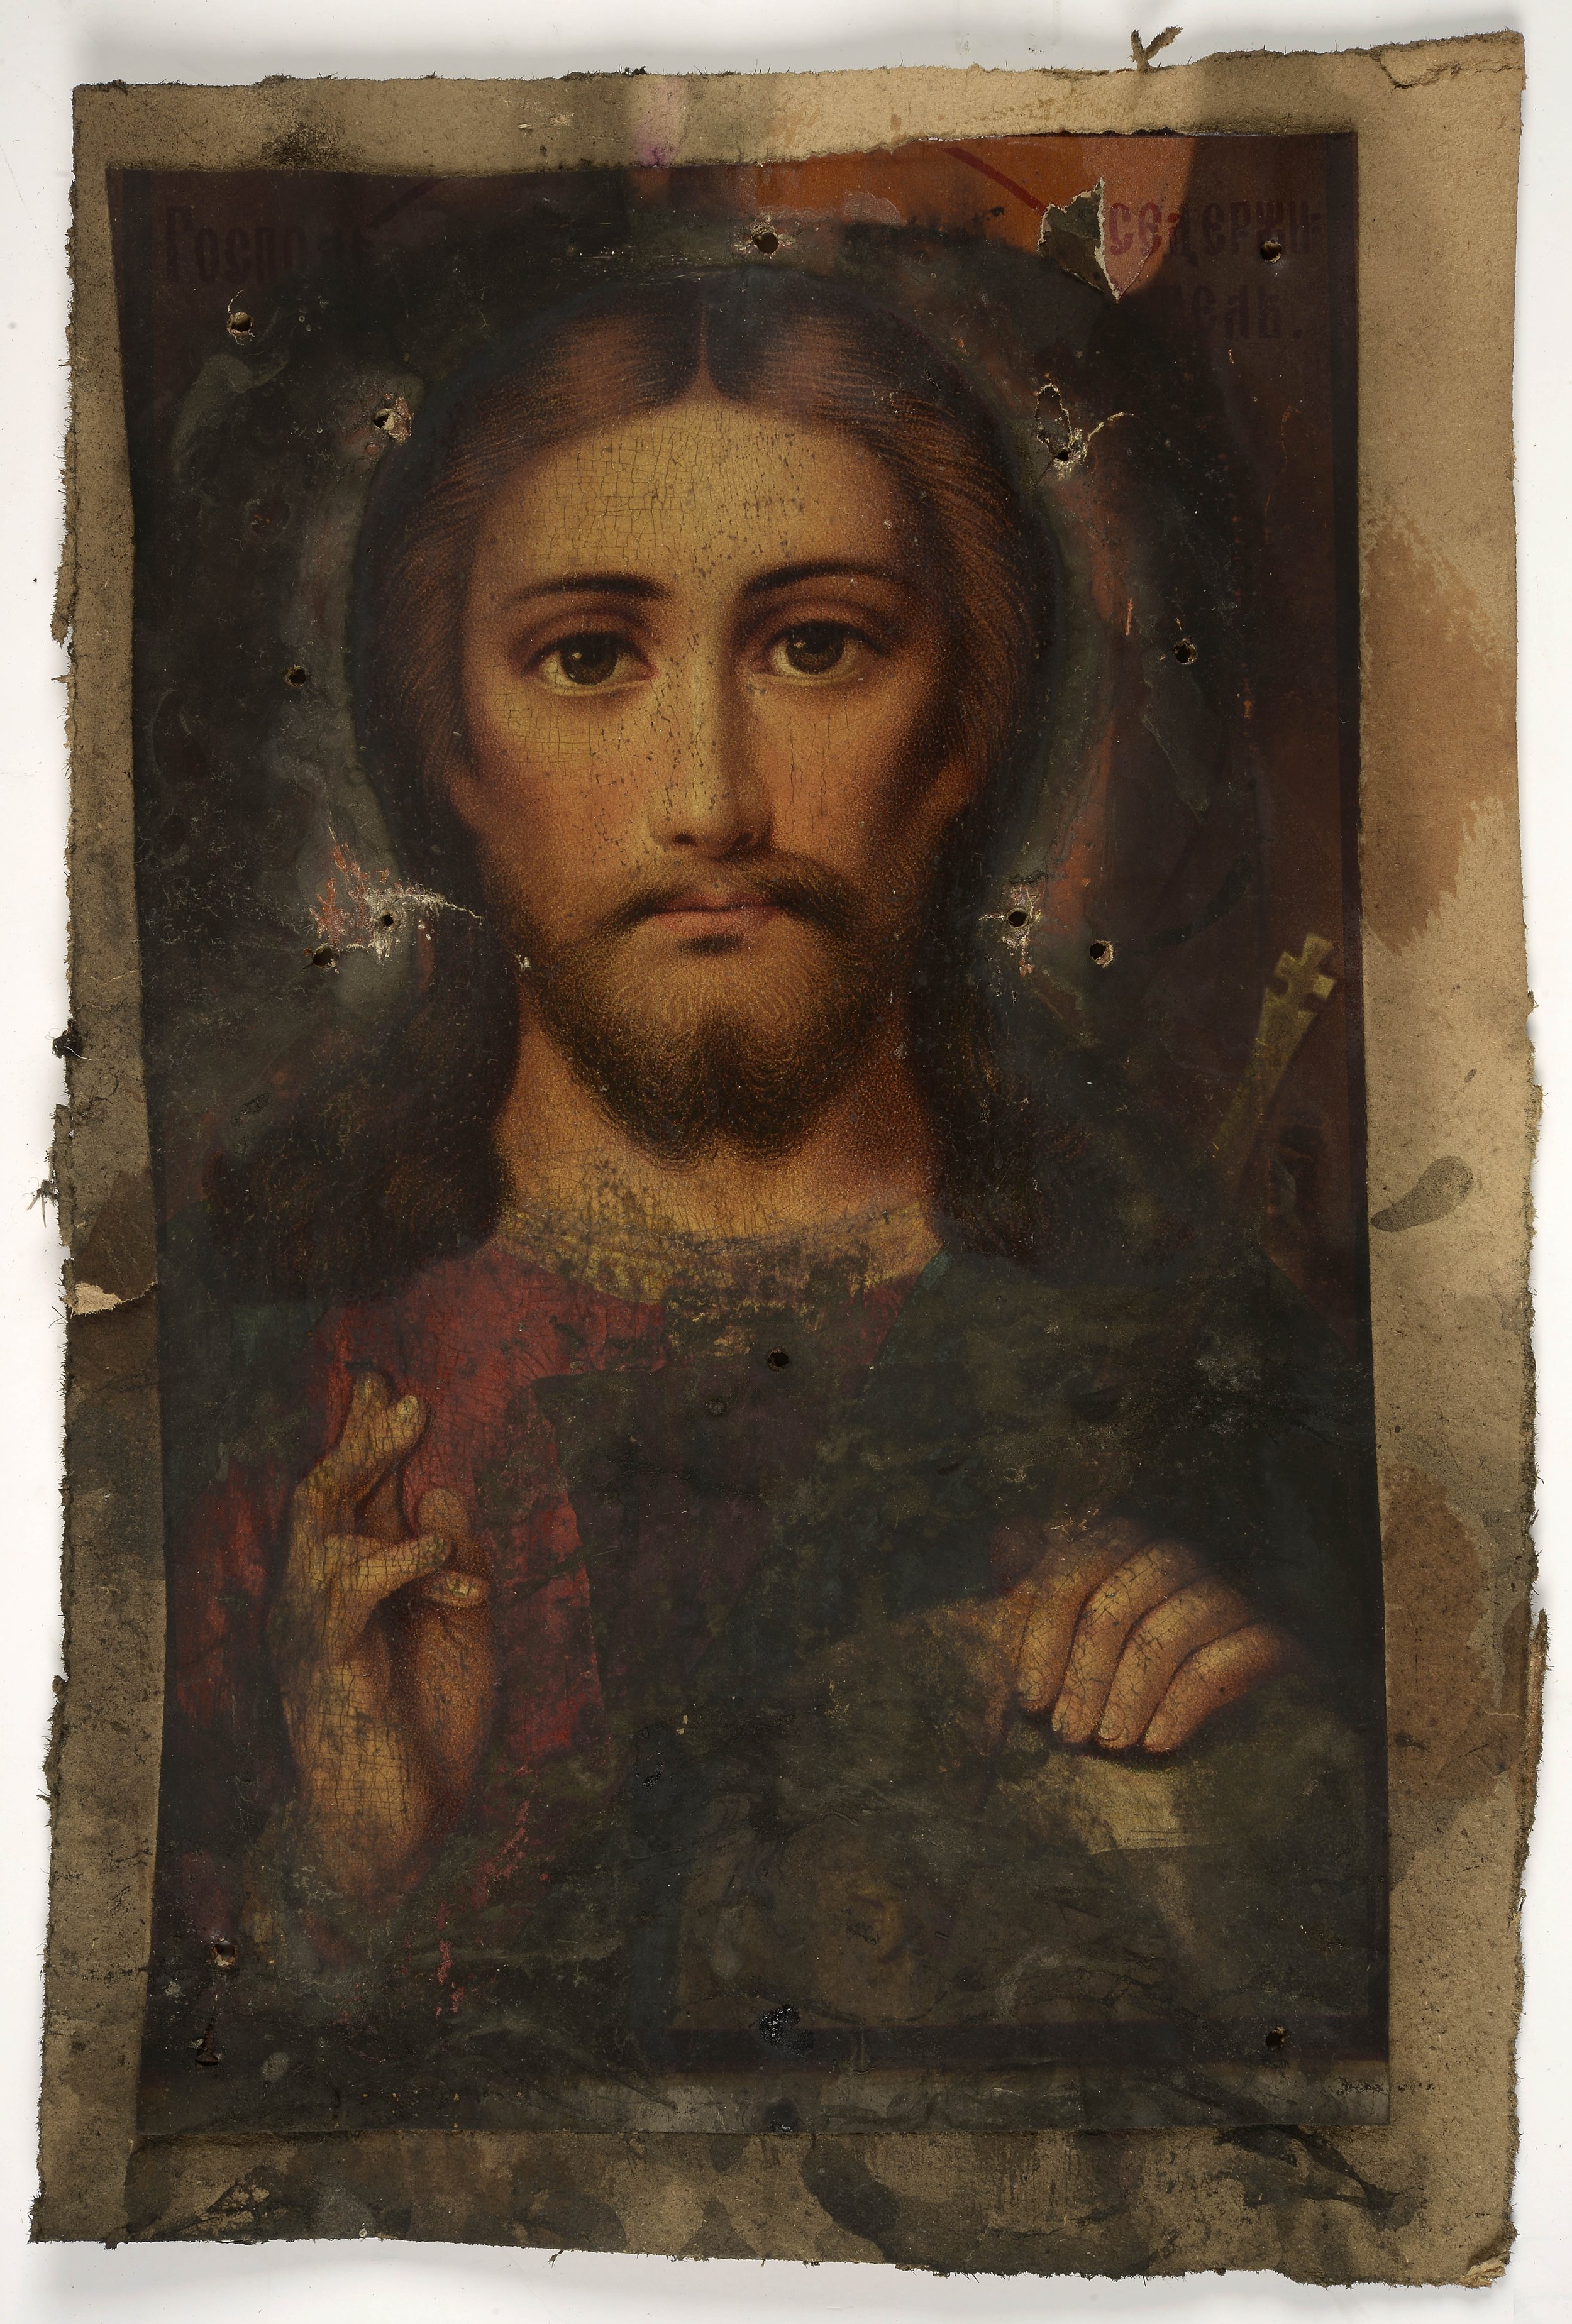
The icon itself, the figure of Christ turned out to be a coloured photo reproduction, carelessly coated with painter’s varnish [ill 2]. The picture was uneven in form and glued onto a thicker piece of cardboard. The cardboard was deformed, the coating layer of varnish was yellowed and some unvarnished patches were sooty, even pitch-black in spots. The icon-cover had been made of embossed thin foil-like tin-plate, the ‘gilded’ coating given by galvanisation. Through the partly transparent metal cover a messing-coloured metal coating on the base paper was visible [ill 5].
The nails that fixed the parts of the icon-cover onto the box and icon were of various sizes and had become loose. Thus the details were either torn or dangled loose. The icon-cover was soiled and sooty, so the golden colour of the metal had turned almost black. The messing-toned base paper was seriously damaged. Moisture and dirt had deformed the fragile material that was torn here and there and contained losses. The layer of metal on the paper had faded, also having soot and greenish corrosion spots on it [ill 6], [ill 7].
Already the planning of the conservation showed that it would be a complicated process due to the association of various materials and the extent of different damages. Although it was evidently planned to make a sumptuous religious object, it was made cheaply. Instead of painting a photo print had been used, cheaper thin copper plate had replaced a proper swaged metal cover and fragile metal-coated paper was used for decoration. By now all these materials (wood, tin plate, paper and print) were in a terrible condition and conservation could not be delayed any longer.
Conservation of the icon
The work started with removing the details of the icon-cover from the box with the help of pliers and tweezers. The next was the cleansing and disinfecting the icon box. The spiders’ graveyard was rather dreadful. First we used a vacuum cleaner and a scalpel for getting rid of all the biological remnants. The box was cleansed outside and inside with distilled water and 2.5% tri-ammonium citrate aqueous solution. viide1 ⁽¹⁾ For the sake of disinfecting, the soiled surfaces were processed with ethanol solution. viide2 ⁽²⁾
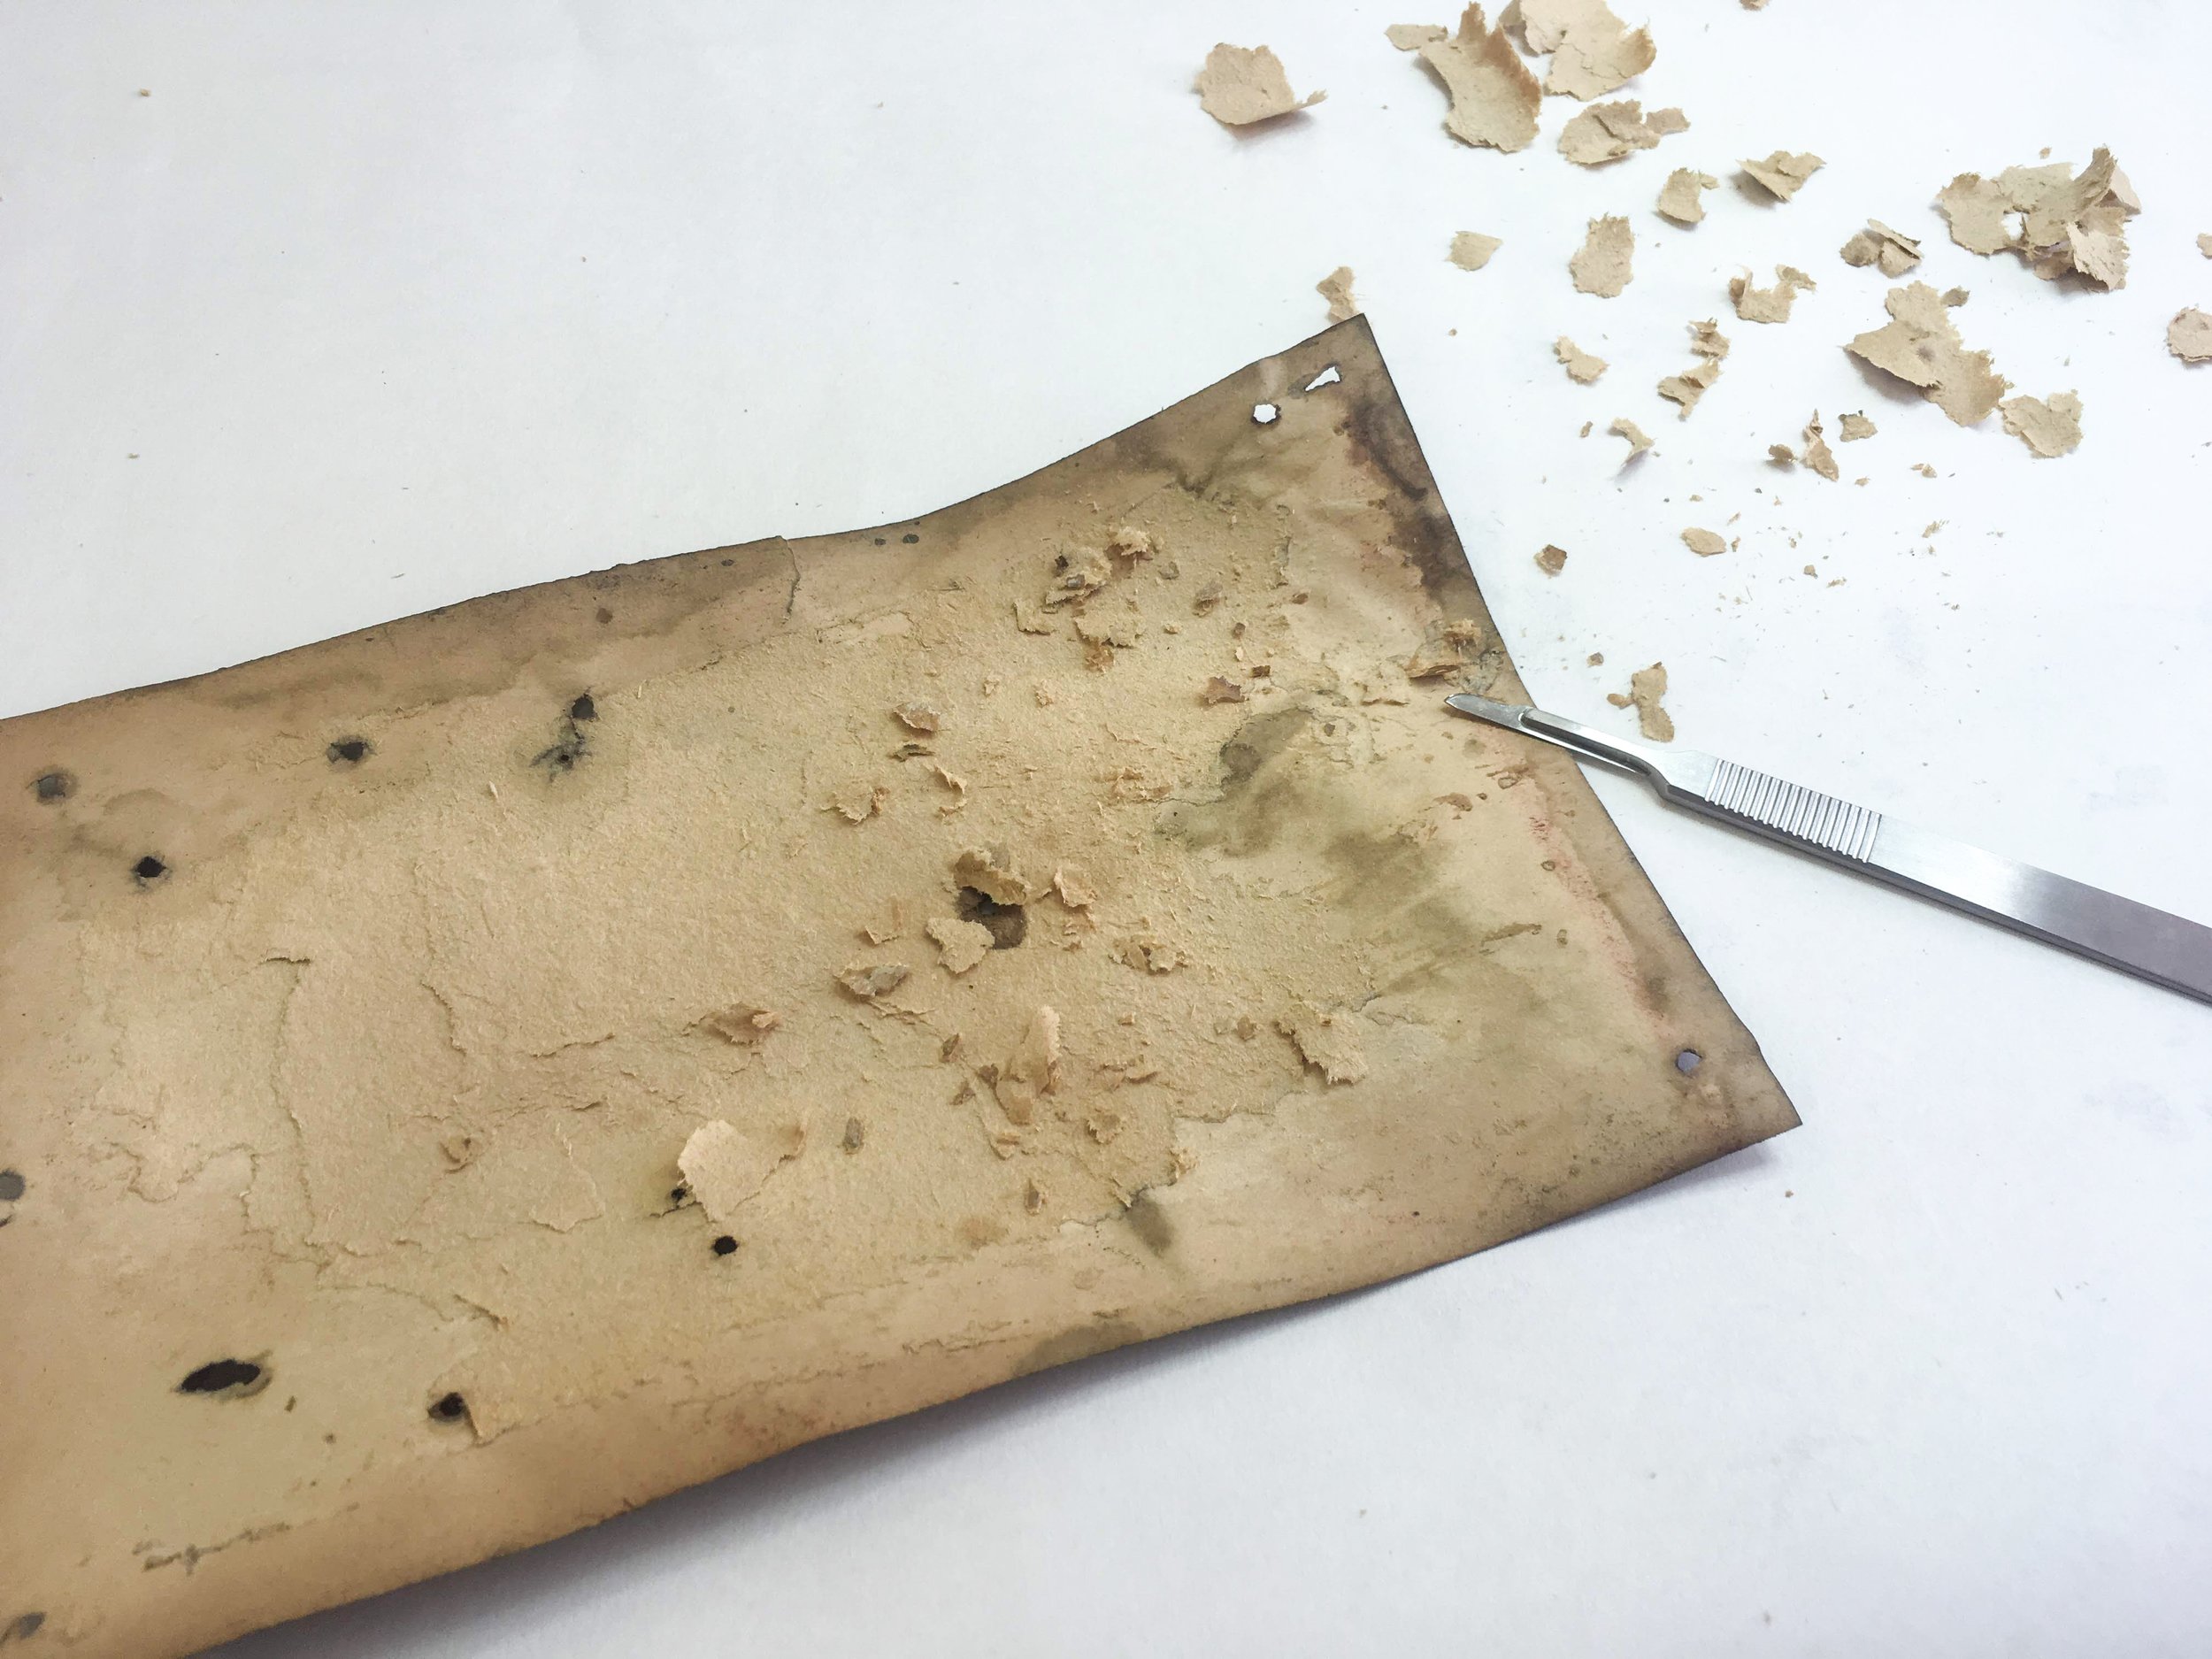
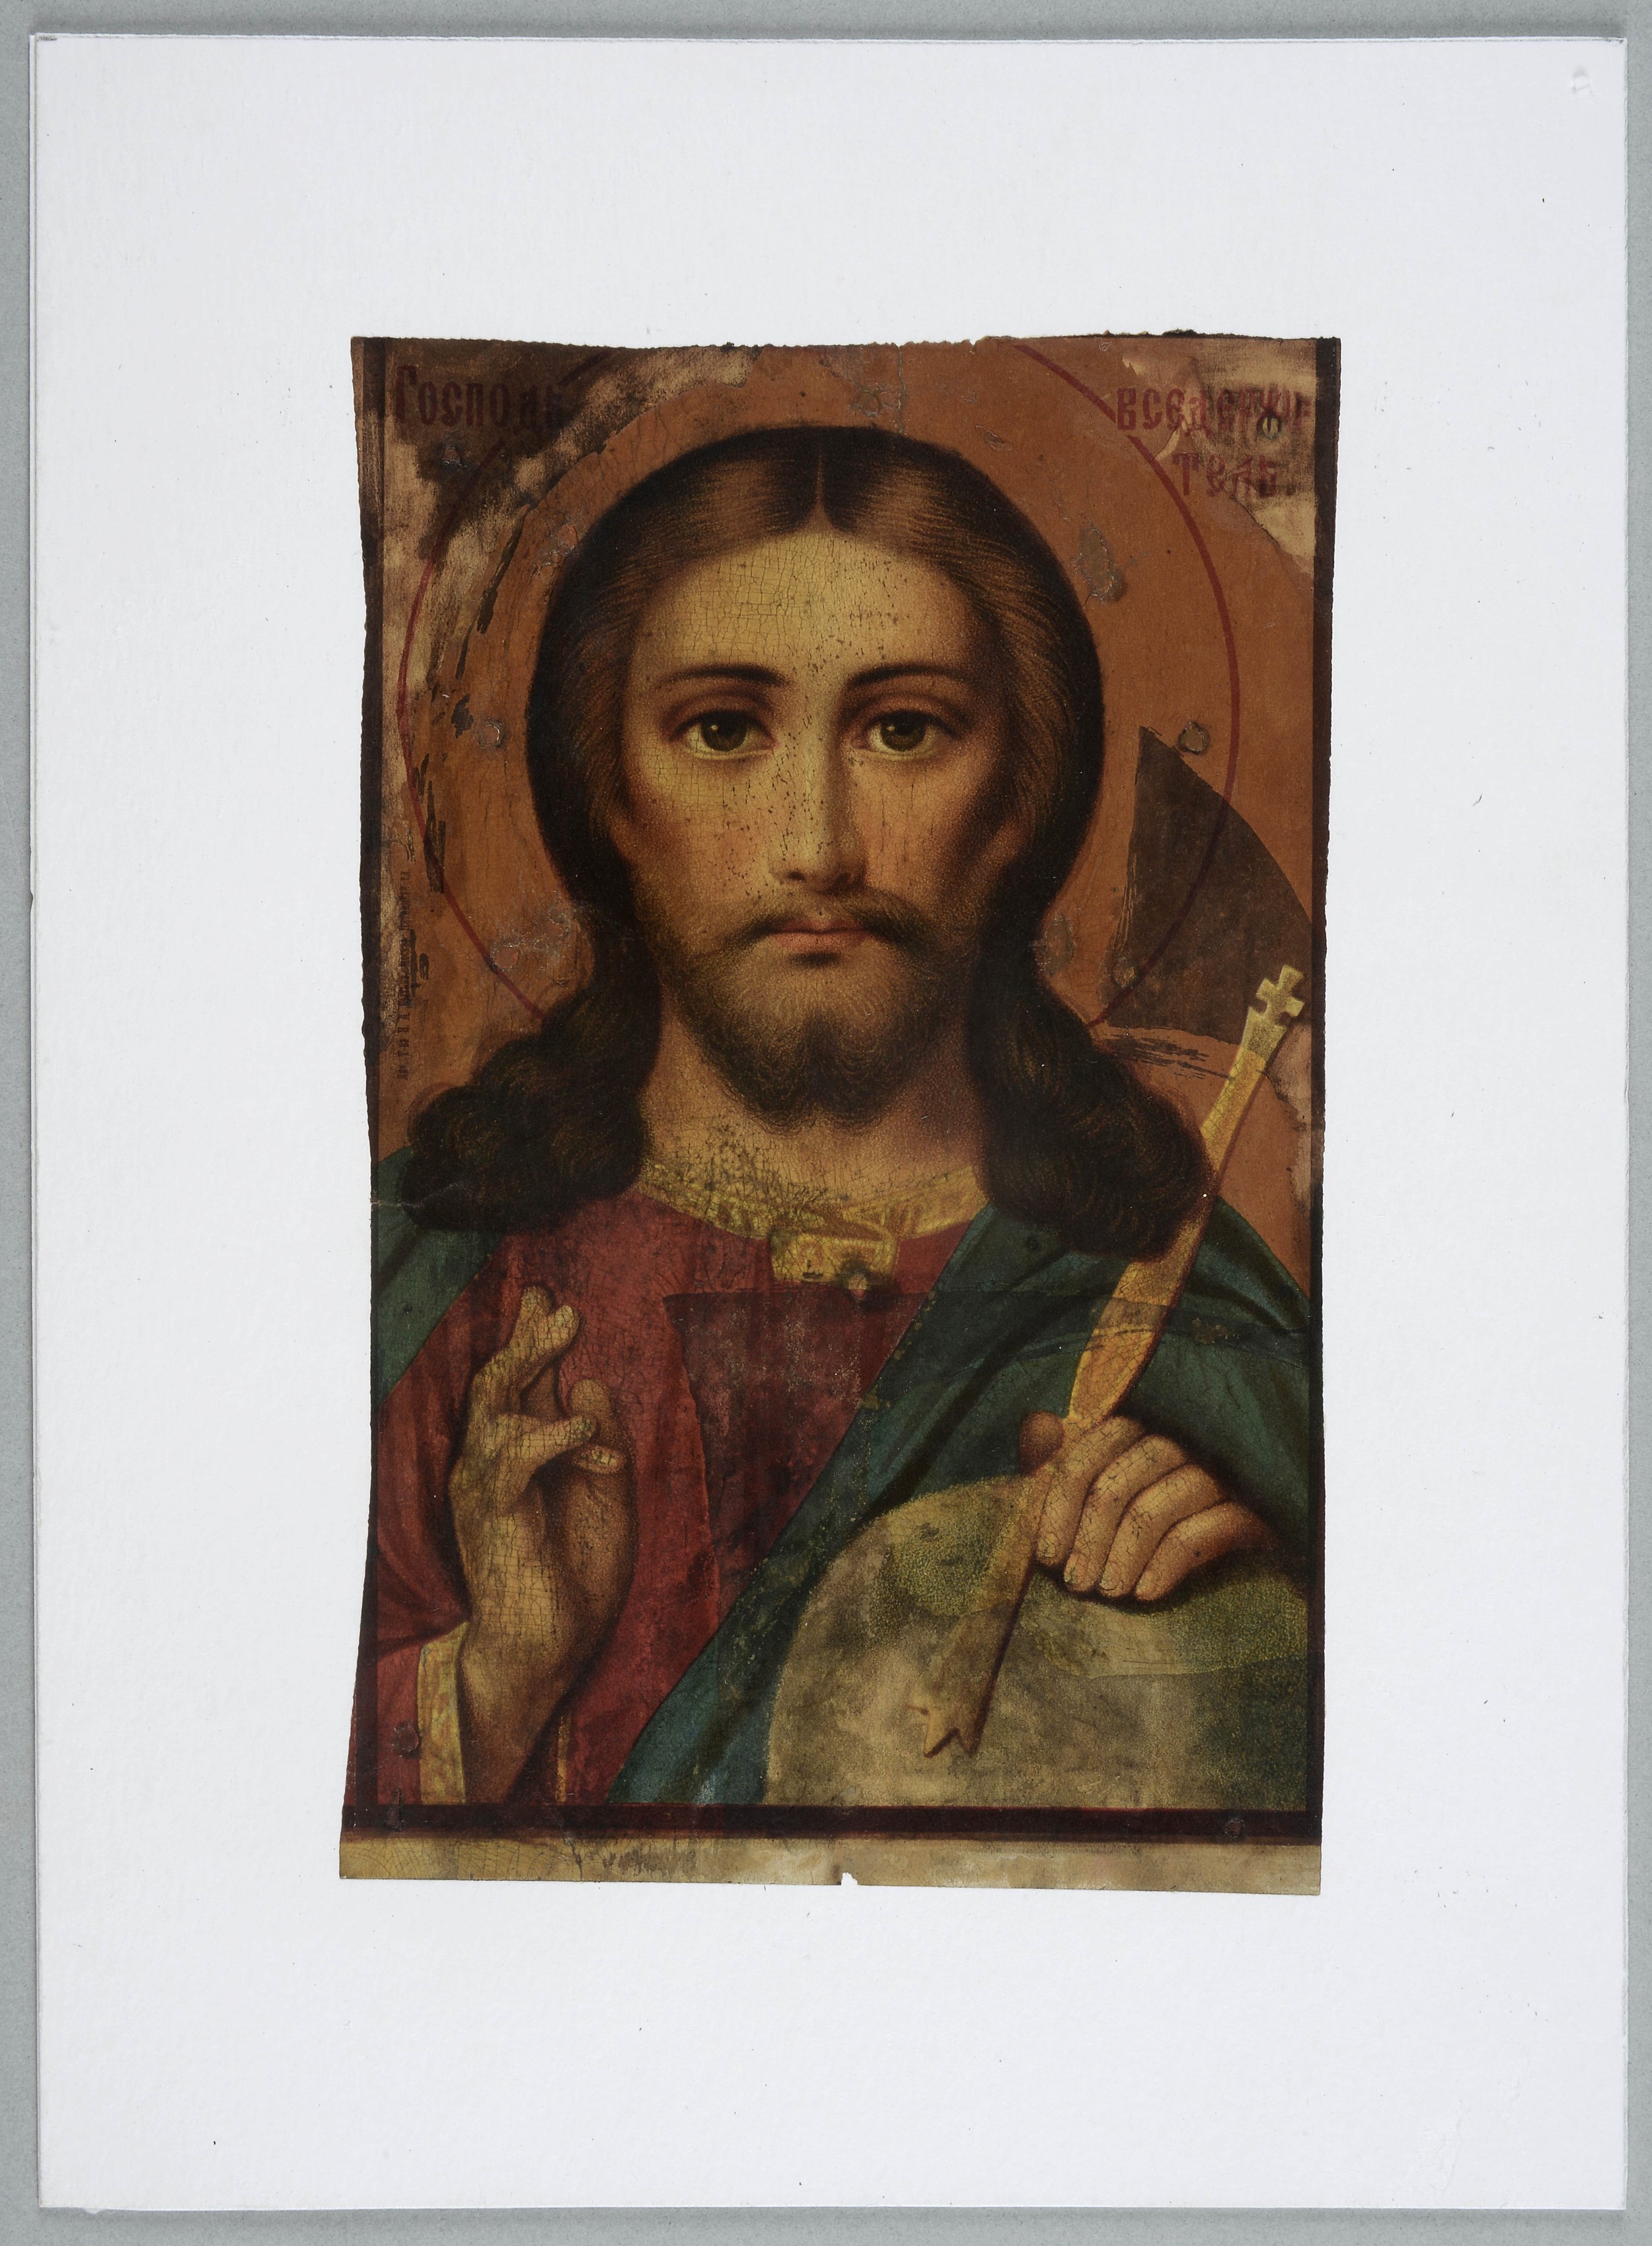
For cleansing the print from the layer of soot the same tri-ammonium citrate aqueous solution was used. The paints and the coating varnish were sensitive to moisture and thus needed near-damp and really gentle handling [ill 8]. As the base cardboard had deformed, being also decayed and mould-spotted due to long-time damp environment it was decided to remove it totally. This was done dry, layer by layer with a scalpel [ill 9]. The residue of glue and cardboard were removed from the back of the print by treating it with 3% methyl-cellulose (further on MC) aqueous solution. viide3 ⁽³⁾The clean print was glued on the archive-safe cardboard with wheat-starch paste. The picture was kept in press for a fortnight in order to get rid of its deformation and to stabilise the paper. Removing the icon-cover had left unequal nail-holes and garish scratches on the print. When the icon had been glued on the new base and stretched in the press the damaged spots were coated with watercolours.
After toning the icon was coated with satin varnish viide4 ⁽⁴⁾ that provided an agreeable matte shade – the icon on paper seemed to be ‘more like a painting’ [ill 10]. Actually, every cheap icon in homes or churches does imitate a more expensive painted icon.
The conservation of the metal icon-cover was complicated and labour-consuming indeed. Still, it was the most exciting part of the whole enterprise. The thin golden tinplate was crinkled and coated with a thick greasy layer of soot. Having tested several cleansing methods it was decided to use suds in a water-tub that allowed light soaking of the metal details as well [ill 11]. After that the dirt and soot on the surface did not resist being washed off with the 2.5% tri-ammonium citrate aqueous solution.
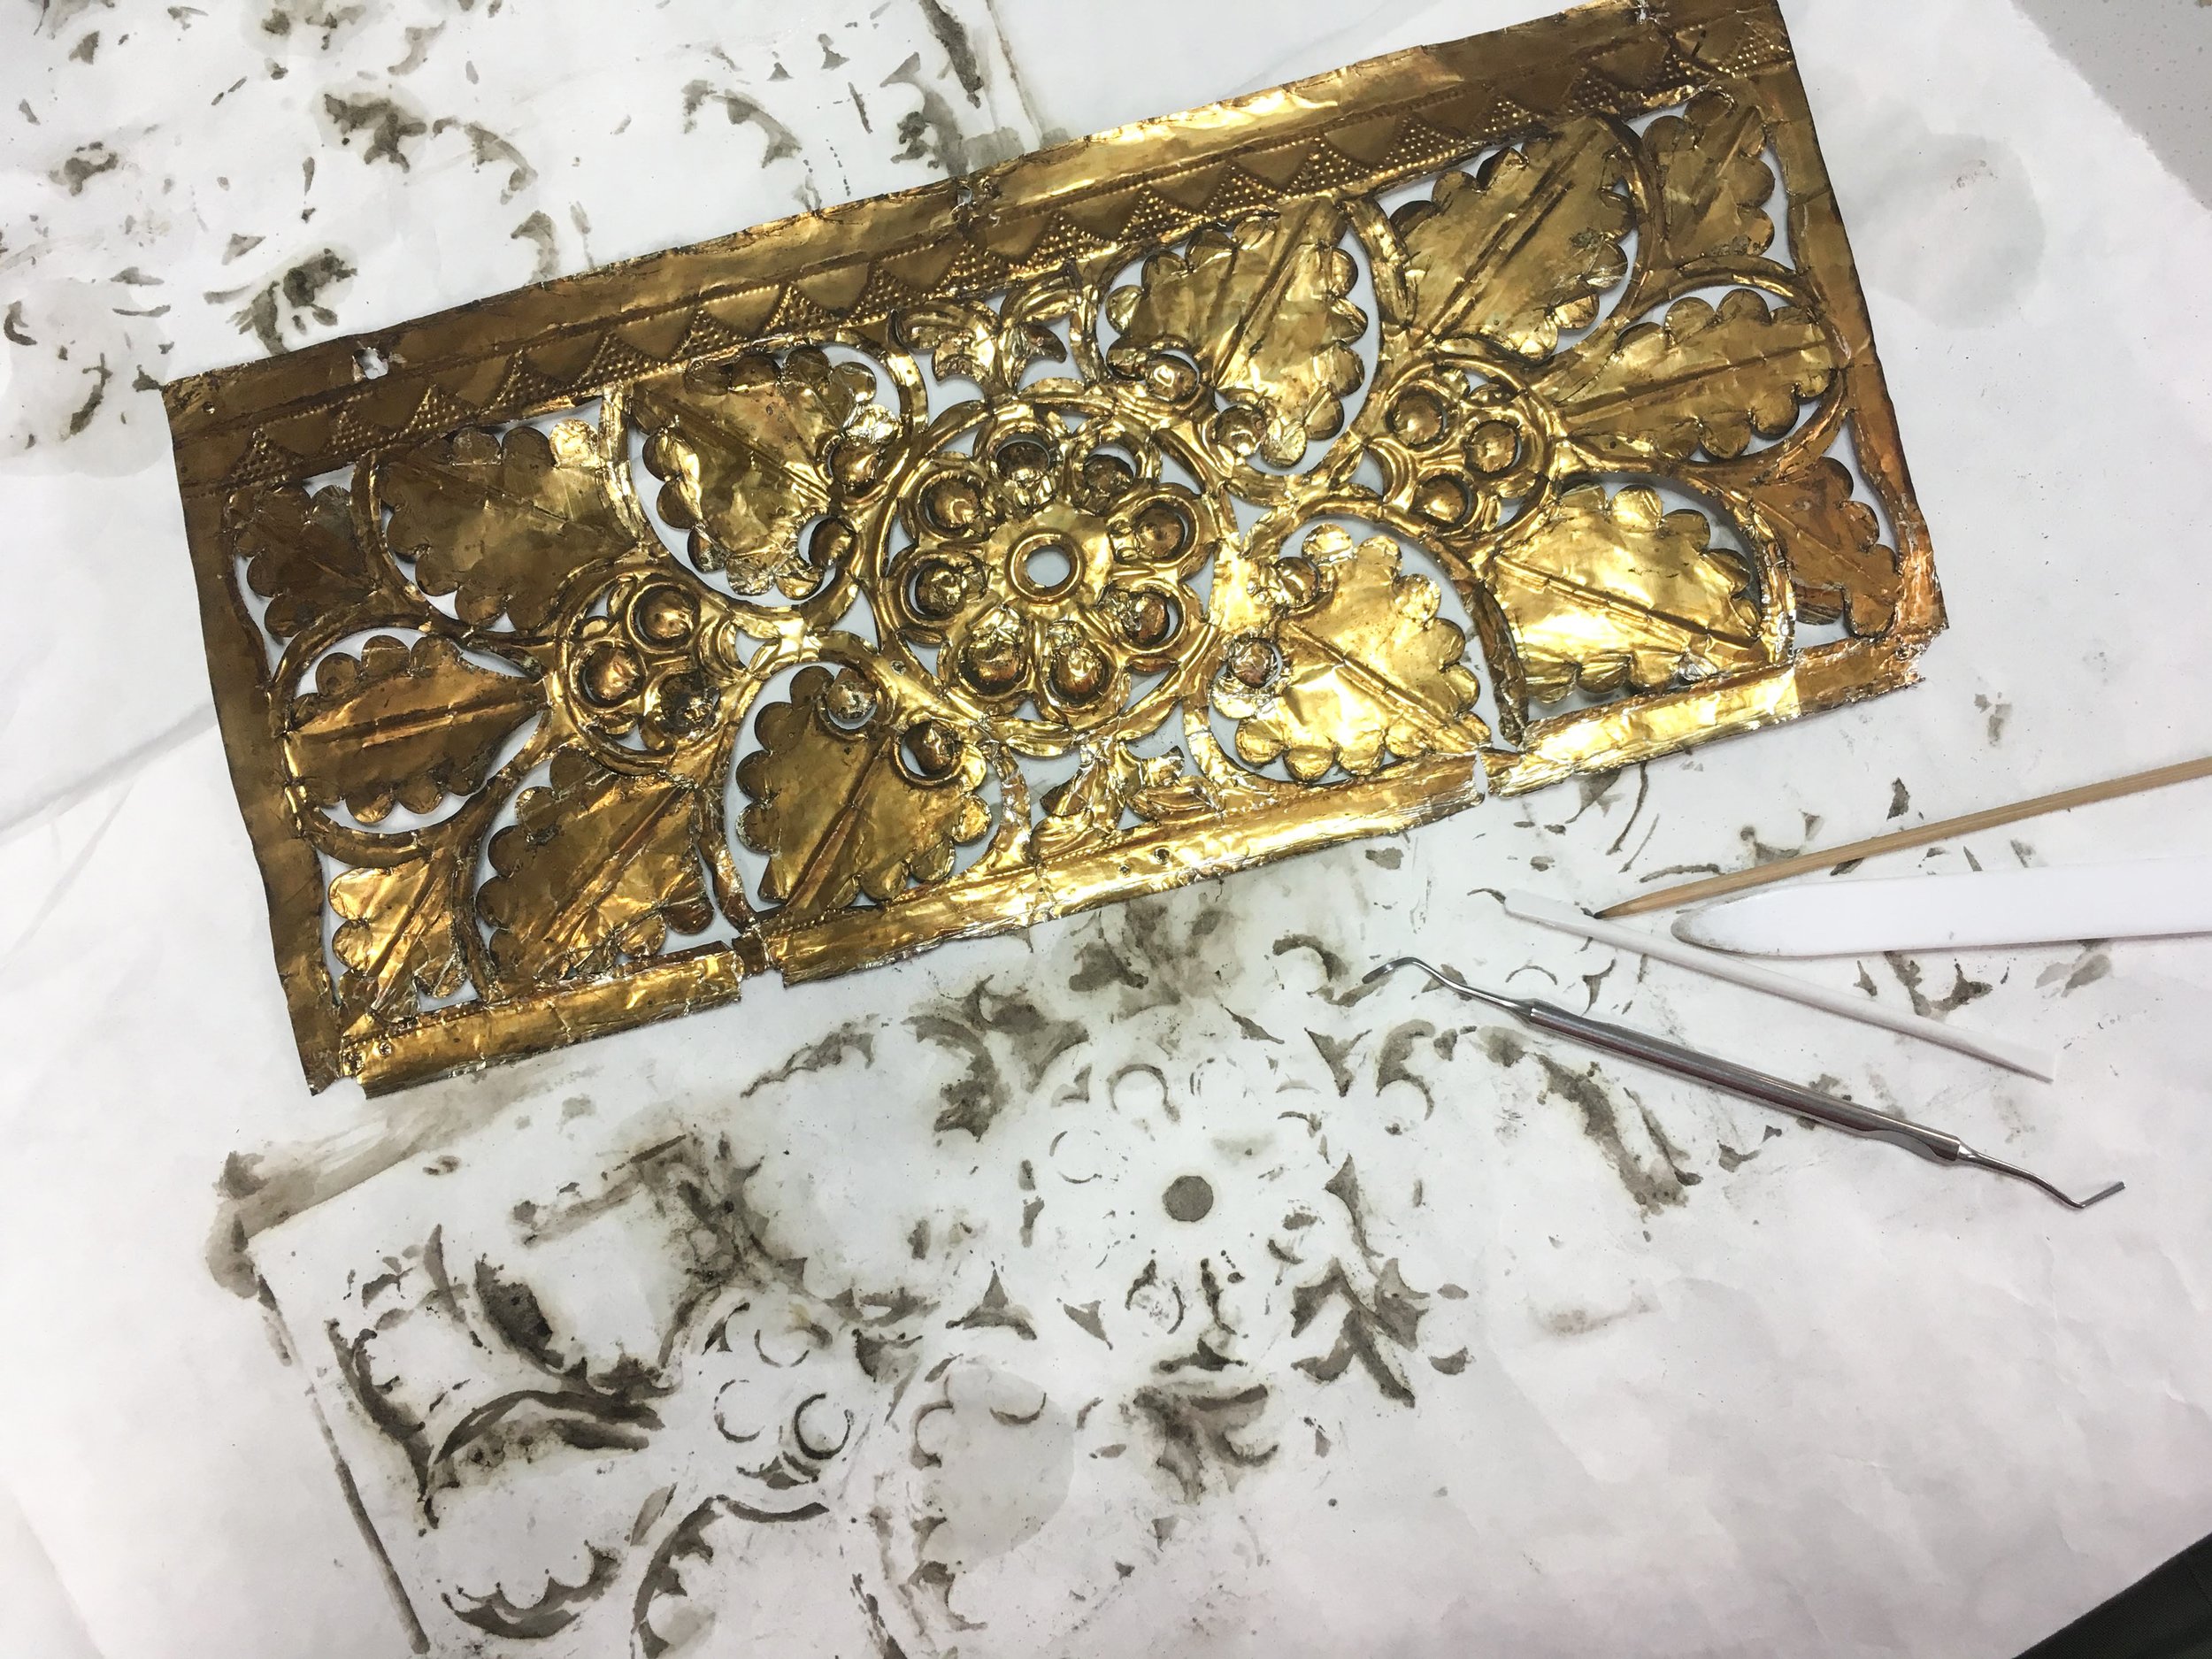
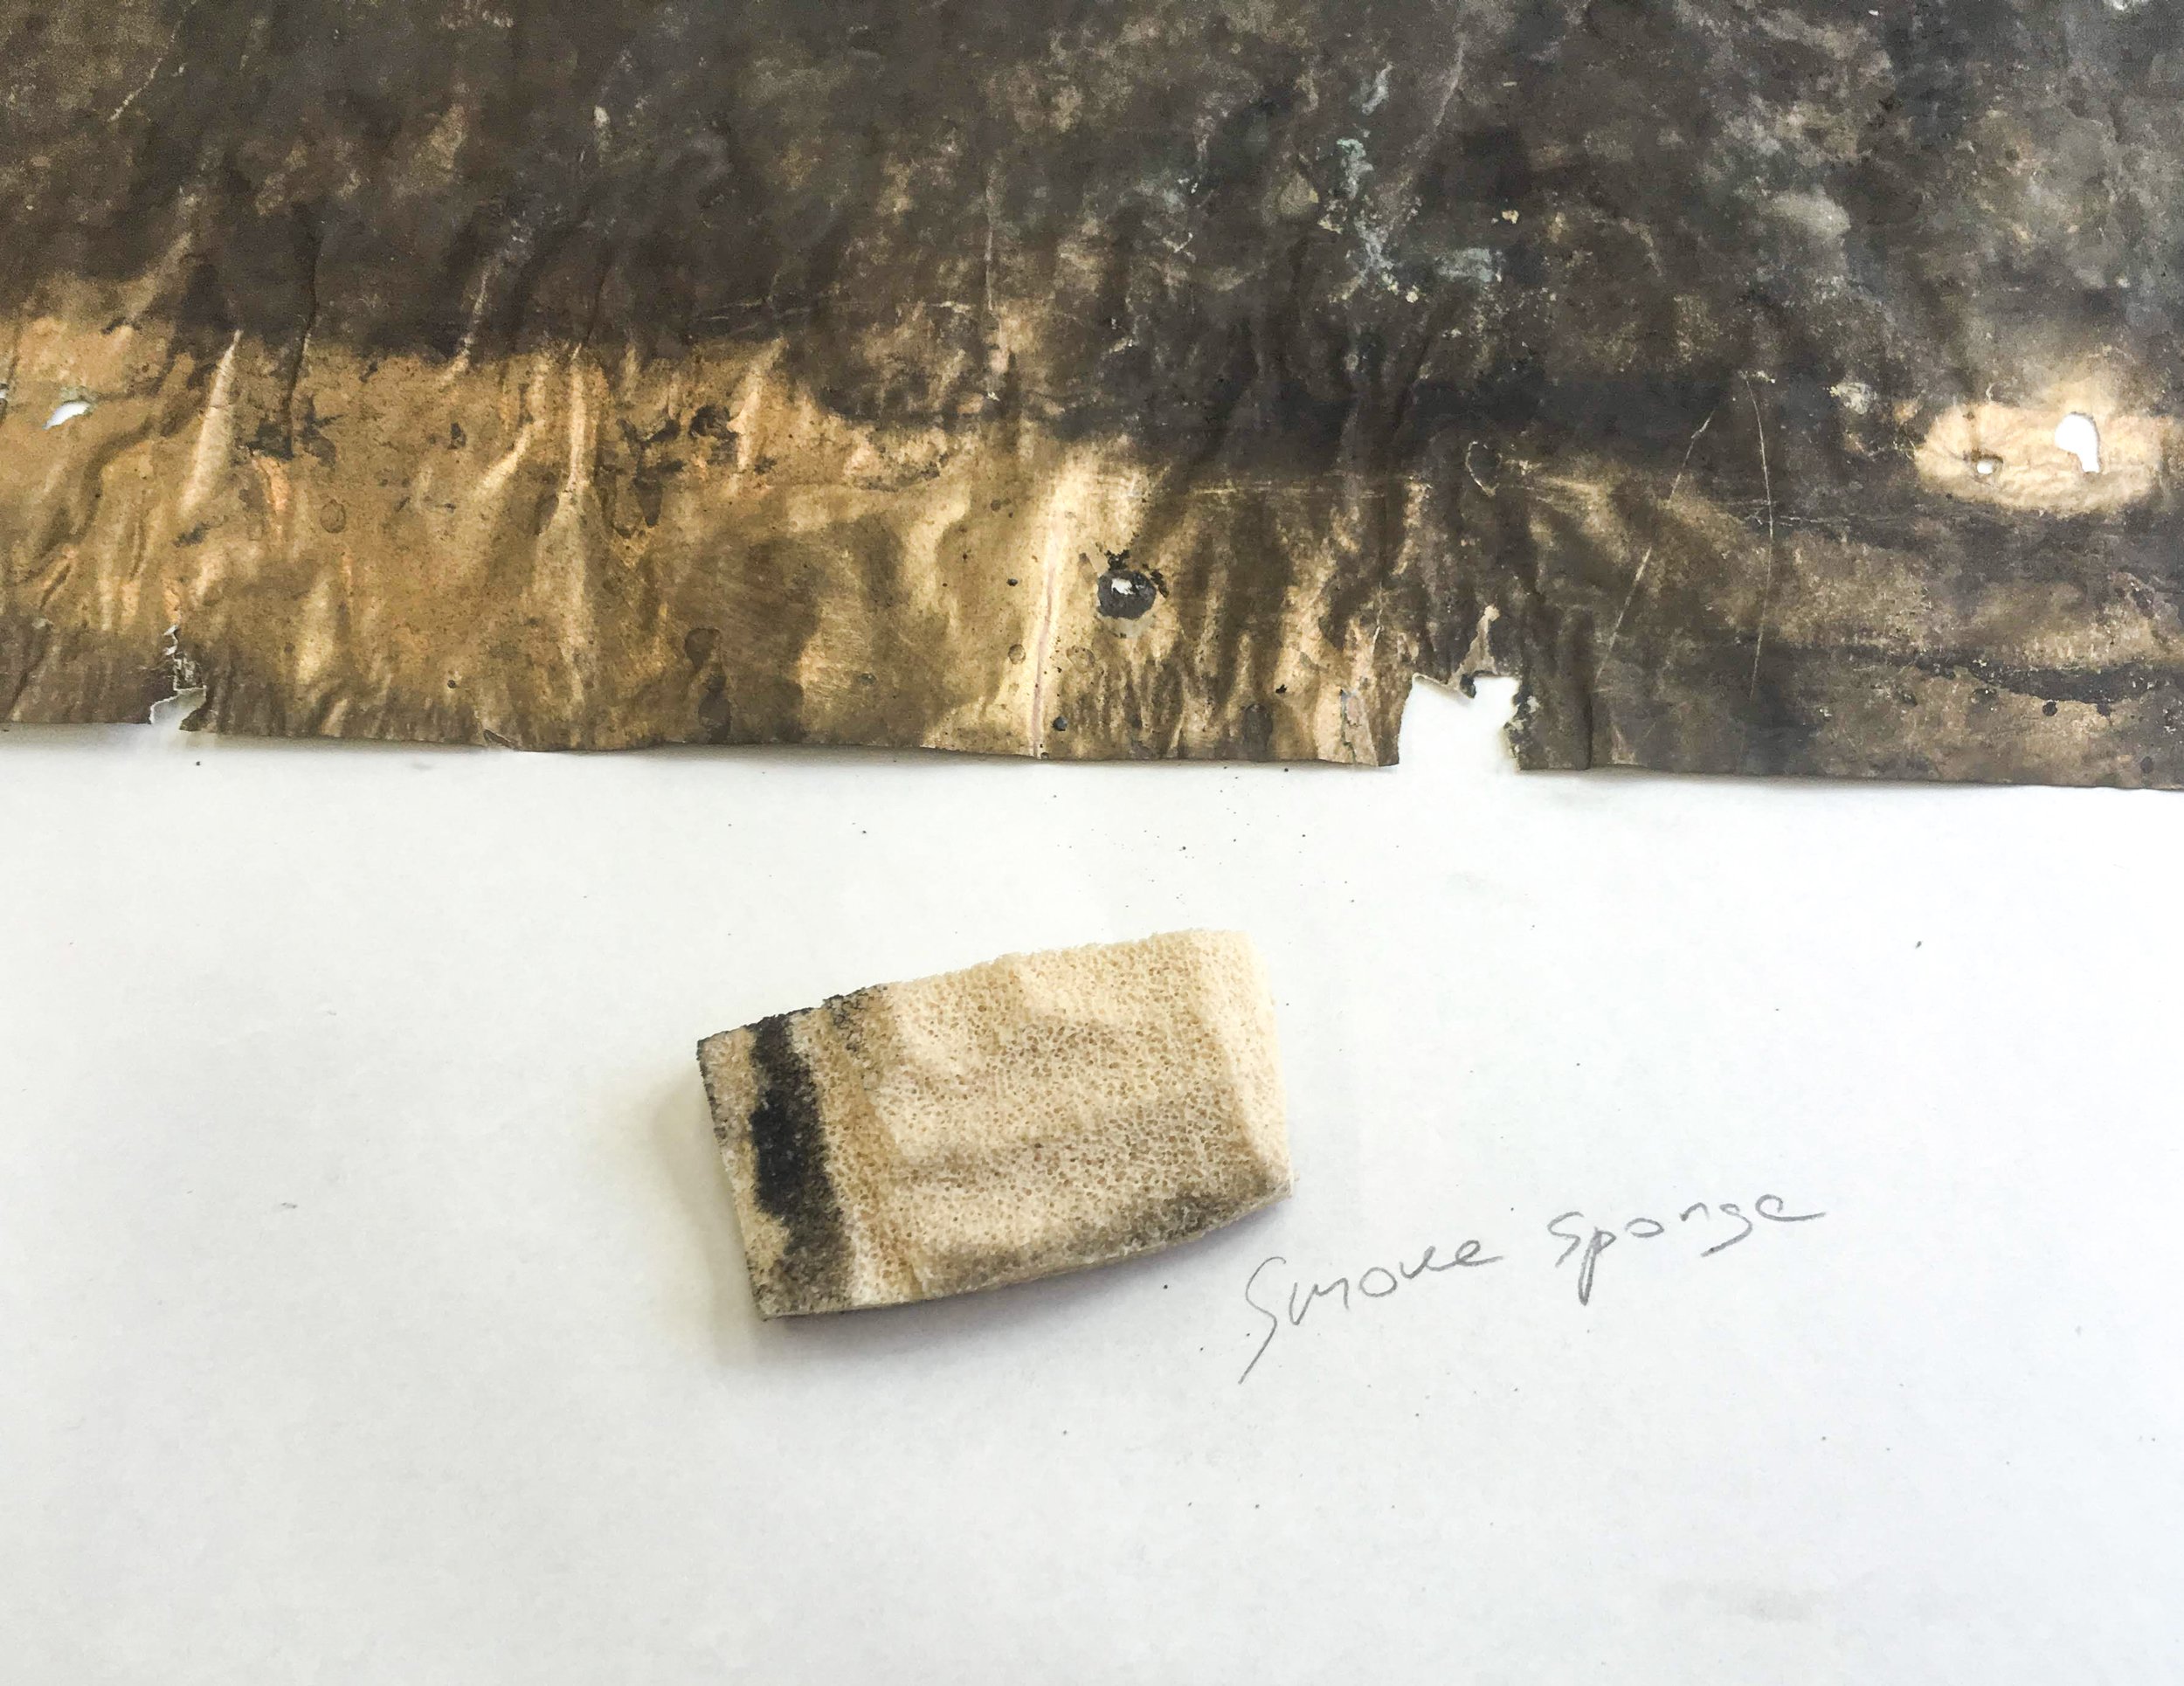
Quite unexpectedly the cleansing process provided us with quite a few alluring pieces of art. The details that were being cleansed left contours of dirt and soot on the filter paper, showing the pattern of the icon-cover [ill 12]. By cleansing the crinkles with cotton-wool tampons and a scalpel we were able to restore the relief of the surface. Swab sticks, a bone smoother and tweezers were used to restore the shape. Smaller tears in the metal sheet were backed with paper veil. viide5 ⁽⁵⁾ One damaged detail was to be toned in order to make its colour match that of the other details. Gilding liquids and pastes were used for the treatment. viide6 ⁽⁶⁾ In order to get a matching shade the coating was blended of four separate gilding materials.
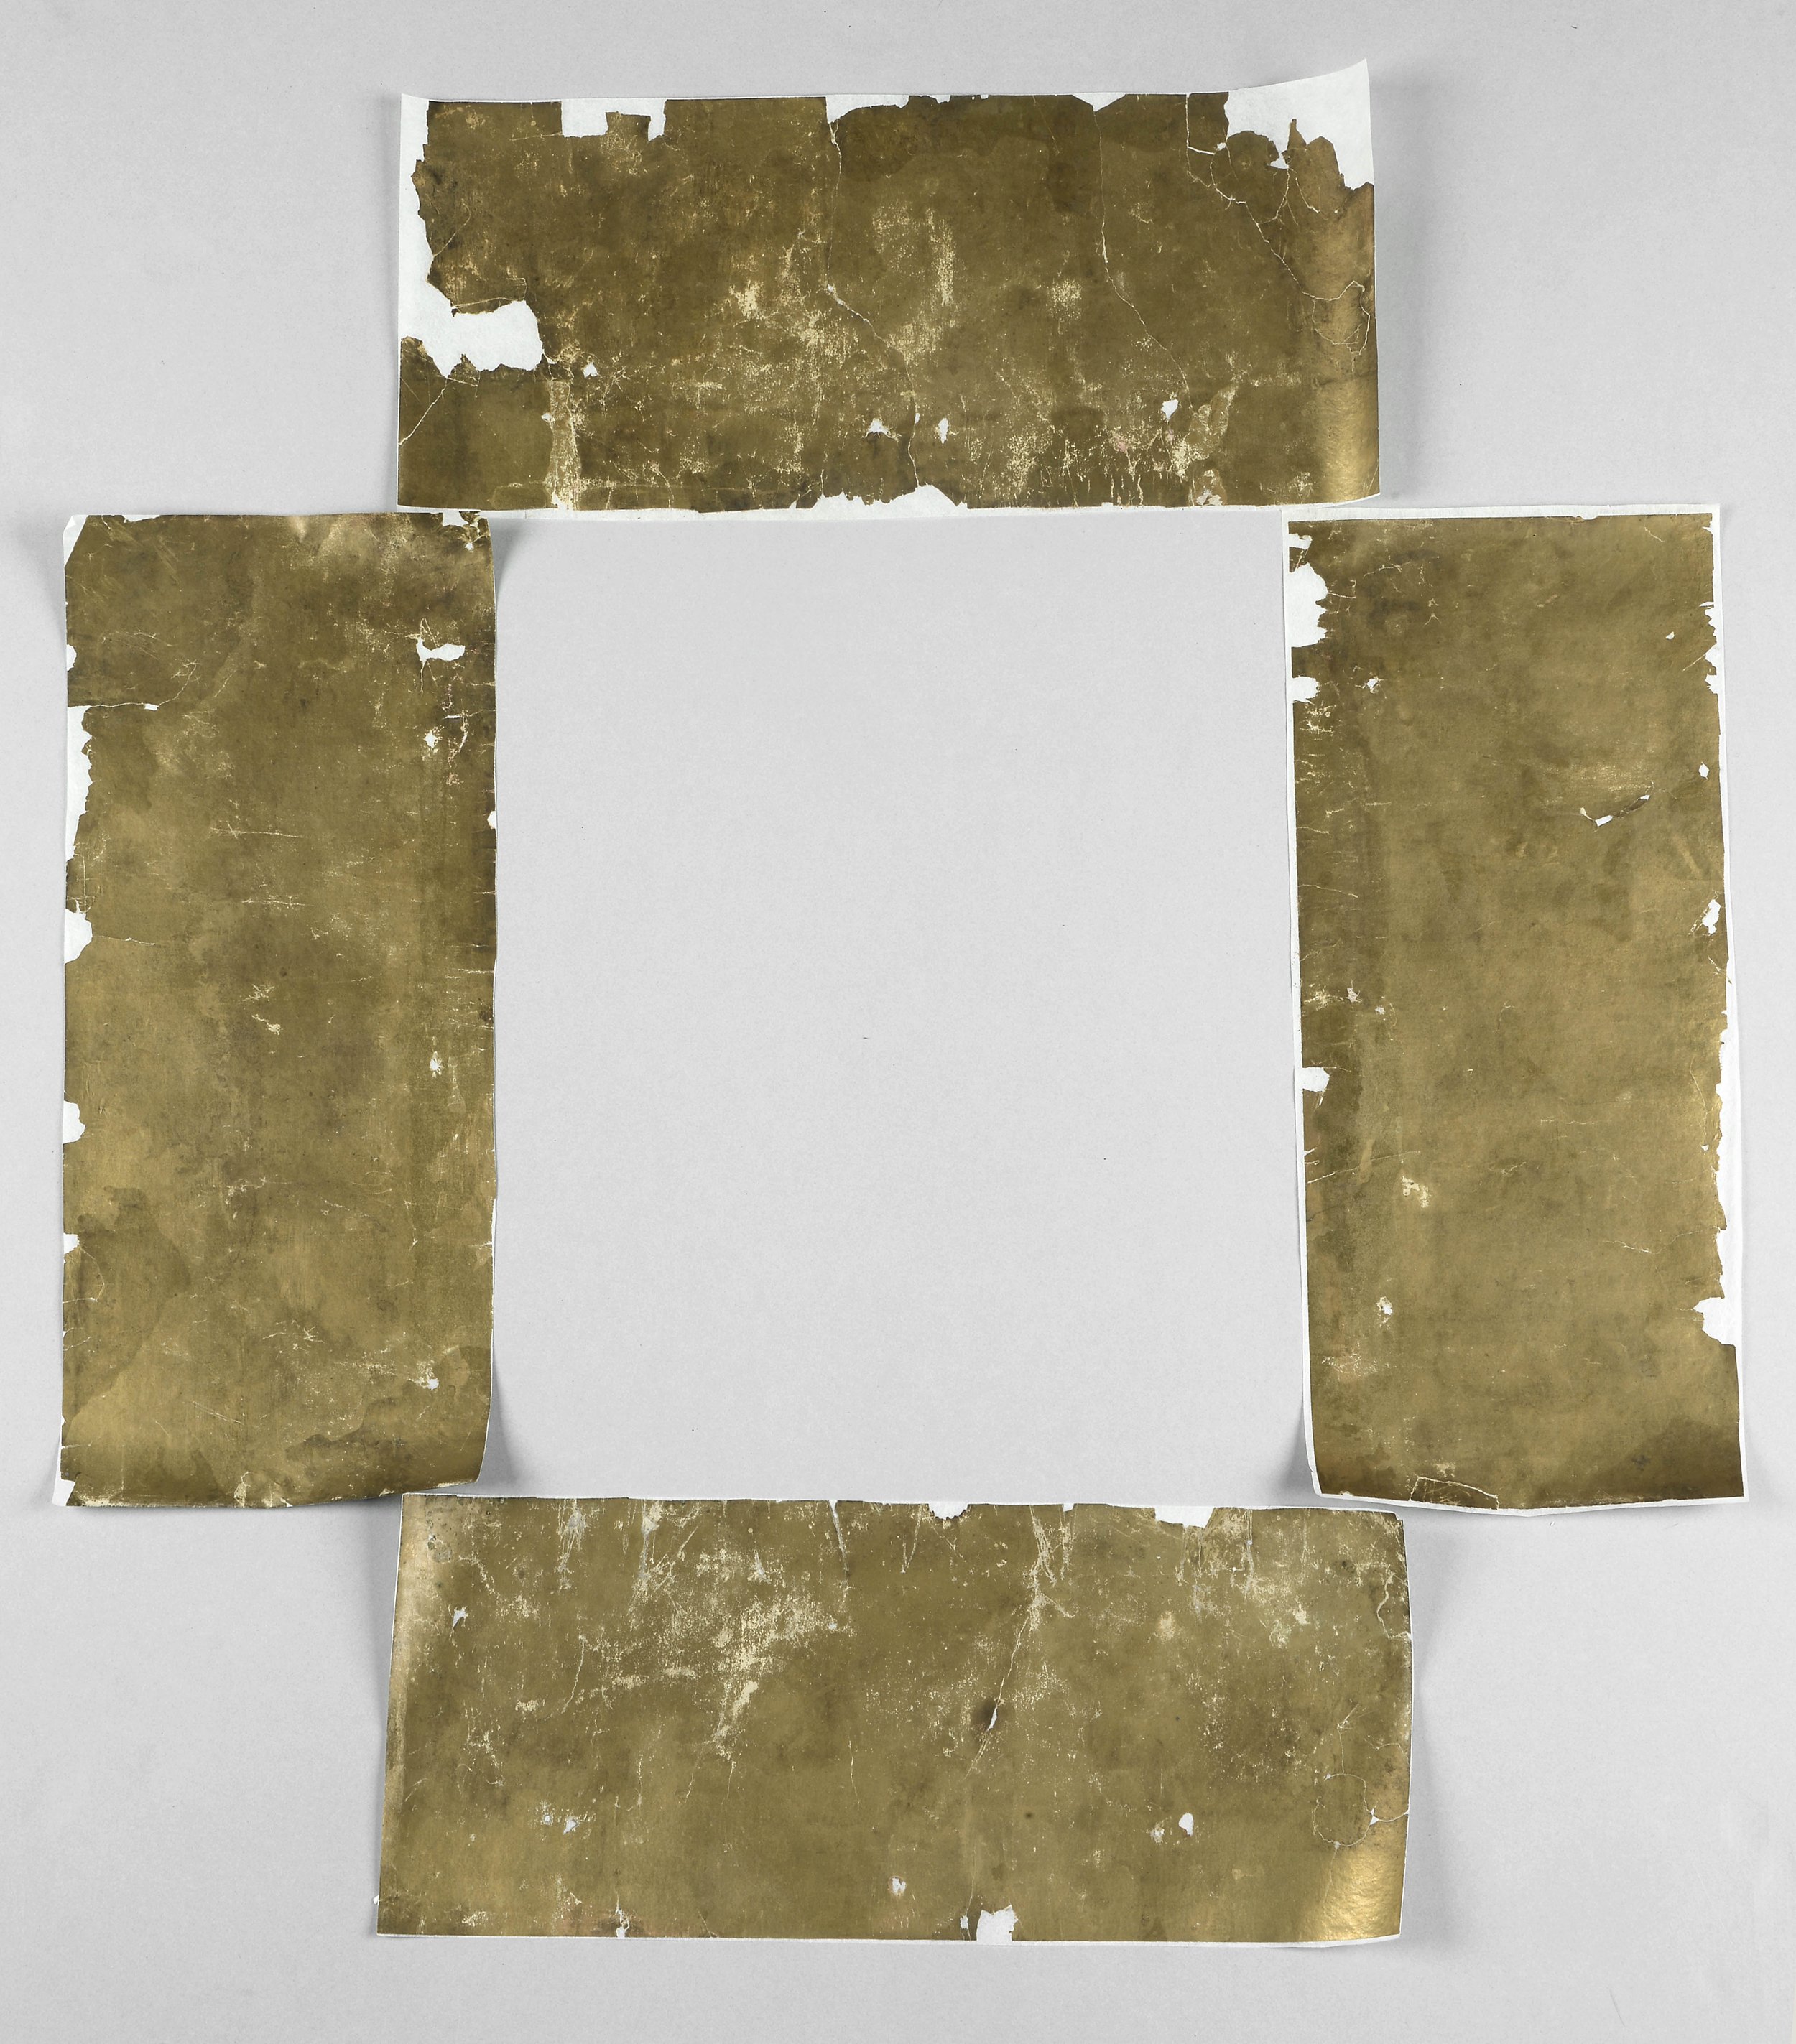
The base paper beneath the transparent metal sheet covered the bigger part of the bottom of the box. The paper was to provide a proper screen for the icon-cover, covering the bottom of the wooden box and the edges of the print. It had been fixed so that an arc-shaped surface was formed on all the sides and that allowed the thin metal sheet retain its concave shape. The base paper was dirty and much damaged in deformation, torn and with oxidised surface [ill 5]. Paper-conservators were a great help in our restoration of the base paper.
The surface dirt was removed with a dry sponge [ill 13]. Spots that were soiled with hardened soot were processed with vinyl eraser and very gently with a scalpel. Initially the result was not satisfactory and so it was decided to give the paper a wash on the vacuum table. The details were moistened with 50% ethanol and set onto the vacuum table. The moistened paper was smoothed and to avoid further creasing vacuum tension was switched on. Cleansing with 7% MC gel and washing with distilled water followed. viide7 ⁽⁷⁾ Greenish corrosion spots were processed with 3% EDTA aqueous solution and finally the paper was thoroughly rinsed with running water on the vacuum table. viide8 ⁽⁸⁾
Backing the base paper on the vacuum table followed the washing immediately. The fragments were turned upside down and set drying in a draught. Simultaneously the backing paper was prepared, coating it with a mixture of liquid wheat-starch paste and MC. With the help of Hollytex fabric viide9 ⁽⁹⁾ the backing paper was lifted onto the back of the moist original and in order to achieve a better sticking contact the vacuum tension was once again switched on. The backed fragments were then fixed on the edges with the karibari method and left drying on the stretching boards. viide10 ⁽¹⁰⁾ They remained there for about a week. Then the sheets were removed from the boards, their upper edges were cut off and they were coated slightly with MC-solution and left for another week to press-dry in between felts [ill 14].
The holes and tears in the base paper were supported with paper. As we could not find any paper in greenish-golden shades like the original, we had to make it blending gilding solution and Maimer’s restoration paints [ill 15].
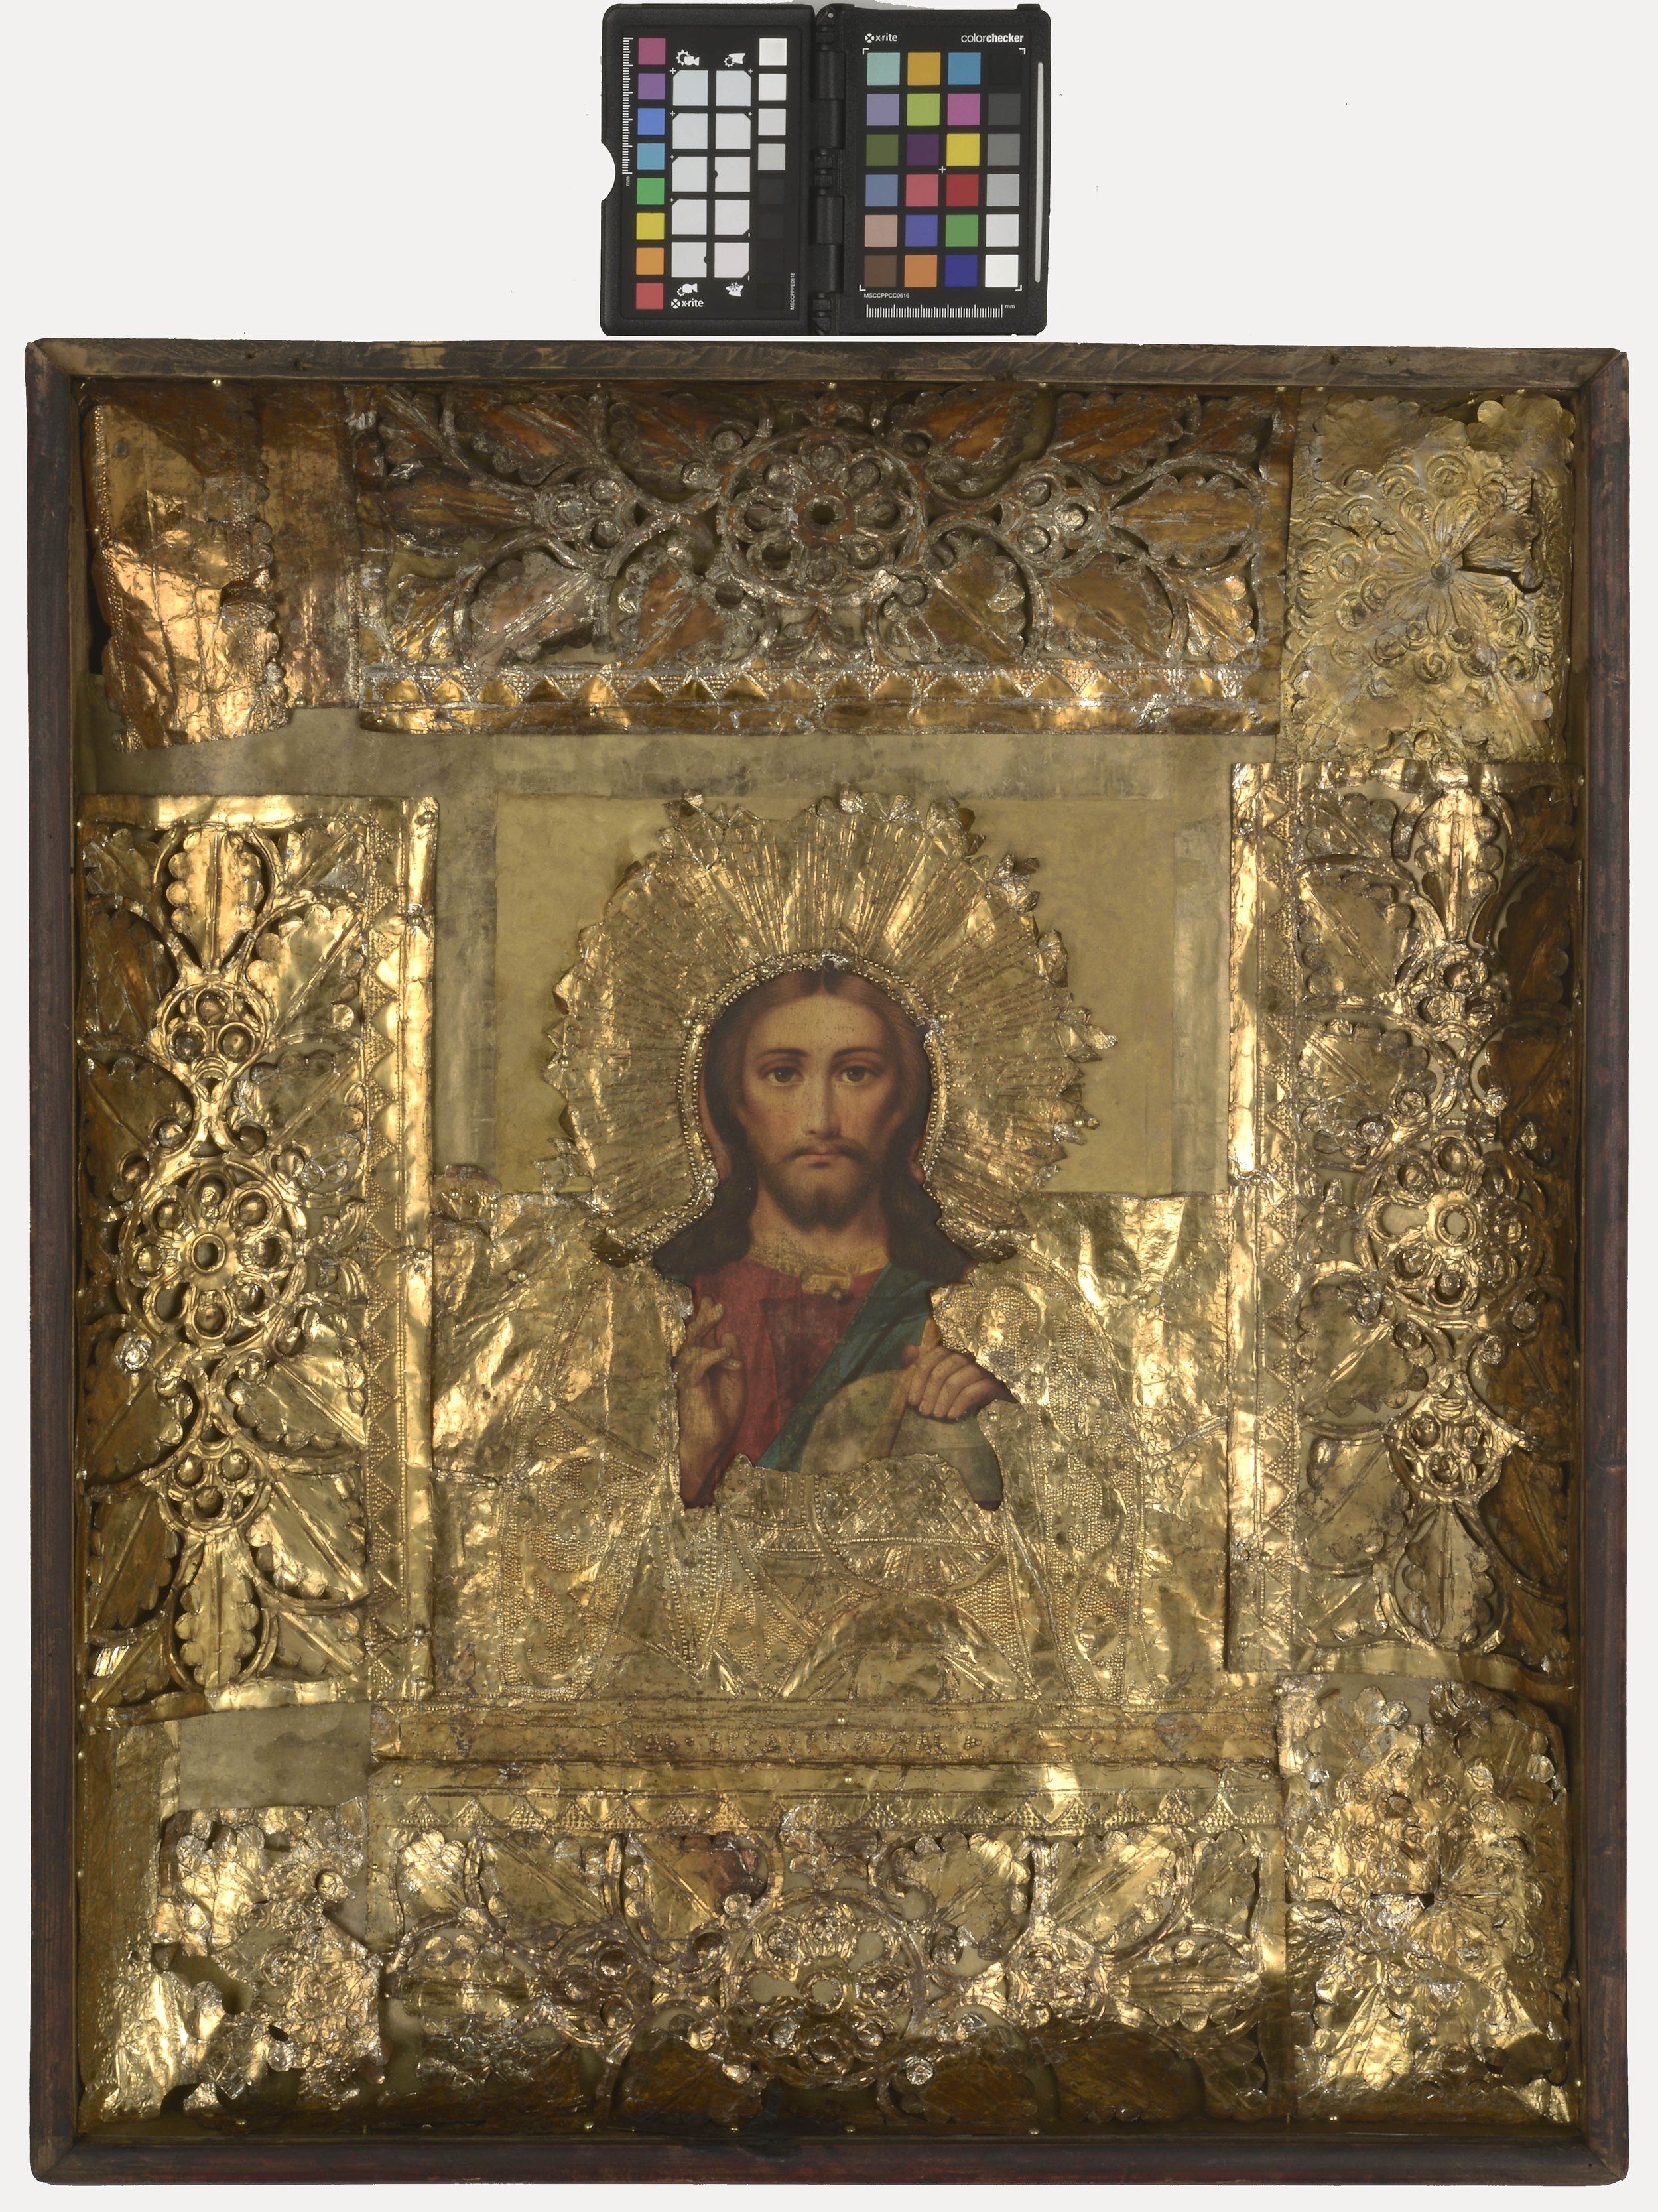
Thus all the materials of the object had been conserved and ready for assembly. It was a large 3D-puzzle. Only the icon-cover itself consisted of 16 loose details. The base paper had to be put together of nine new and old pieces. The picture was placed in the middle of the box and fixed with paste onto the bottom. The base paper was fixed with nails around the icon and the bottom of the box. At some spots paste had to be used, too. The paper was shaped into concave surfaces on the edges of the box in order to keep the icon-cover in proper shape. The cover was fixed with decorative golden nails. Some joints had to be toned so that they matched with the background. viide11 ⁽¹¹⁾ The box construction was spruced up, new wooden slats for holding the glass cover were made and set. viide12 ⁽¹²⁾ Repairs of the box and surface were done with water-colours viide13 ⁽¹³⁾ and Maimer’s restoration paints. viide14 ⁽¹⁴⁾
The glass will protect the icon from dust and environment factors and give the object a dignified and completed look [ill 16].
Summing up
When choosing methods for conservation we considered the Kanut’s best experience and practice as well as our knowledge of materials. All the methods applied respected the authenticity of the object according to the ethics of conservation and all the materials used were object-sustainable and possible to be removed if the need appeared.
Sprucing up the icon lasted for three months and included –
• Cleansing the object of soot, dirt and colonies of dead insects.
• Dismounting the object, whereas all the parts i.e. – the icon (the print), metal icon-cover, base paper, box of the icon – were conserved according to their condition and peculiarities of the material.
• The arranged details were set again in their proper places. The conservation granted the object its past glory despite the cheap materials used and the its time-changed looks.
The team – Maria Lillepruun, Viljar Talimaa, Tea Shumanov, Maris Allik.
Viited
Tri-ammonium citrate (sequestering agents) – that turns almost dissoluble dirt particles, soot included, more soluble in water. (OÜ Kemasol, Estonia). ↩︎
Ethanol (OÜ Kemasol, Estonia). ↩︎
Methyl cellulose ~3% aqueous solution, (MC- Methocel A4 M, Deffner & Johann). ↩︎
Satin varnish in aerosol (Lefranc & Bourgeois, AS Vunder). ↩︎
Mikalent is a kind of veil paper , made of 100% long-fibre cotton in Russia, (St Petersburg) ↩︎
Gilding solutions #710, #723, #724 (Lefranc & Bourgeois, AS Vunder), gilding paste Goldfinger Antique Gold (Daler & Rownwy, Galerii-G OÜ). ↩︎
A few drops of NH4OH (ammonium hydroxide) were added to distilled water to increase the effect of washing and make the solution more alkaline (pH 8.0). ↩︎
EDTA – triethylamine or 2.2.2-nitroethanol is a sequestering agents that turns copper compounds (green corrosion products on paper) more soluble in water. ↩︎
Hollytex is a fabric made of polyester, (PEL, UK). ↩︎
Karibari is a Japanese drying-frame that helps to dry and stretch paper objects avoiding their deformation. ↩︎
Gilding solutions Or Riche and #715 (Lefranc & Bourgeois, AS Vunder). Maimer’s restoration paints #493, #474, #535 and #297 (Kremer Pigmente, Germany). Mica powders Sunset Gold M9233XB and Custom Gold (MN002) (Sepp Leaf Products). ↩︎
Cold glue Titebond (Kremer Pigmente, Germany) was used in repairing wooden details. ↩︎
Water-colours (St Petersburg, Nevskaya Palitra) ↩︎
Maimer’s restoration paints (Ready-made Colors, Kremer Pigmente, Germany). ↩︎